Setting up Django 5.1 using Python 3.12 with pyenv and Poetry
Python dependency management has historically been fairly complex. There are various package managers like pip, pip3, pip-tools, conda and more. You will also need a virtual environment. Otherwise packages in different projects can overlap with each other. That’s why it’s helpful to have a virtual environment wrapper like virtualenvwrapper or pipenv. Oh, and we haven’t even talked about our Python version yet.
It’s a lot. Luckily for us, we don’t need all those tools. We can set up a professional environment with just the following two:
- Pyenv
- Poetry
By the end of this article, you will understand how to manage Python versions with pyenv. You’ll be able to create new projects using Poetry and install the exact dependencies you want. You can then apply this knowledge to any Python project.
In this article I will make a few references to Node.js. This should serve as a heuristic for people familiar with npm / node_modules that are trying to get started with Python.
Installing Python with pyenv
Described as “Simple Python version management”, pyenv is a version manager for installing various different Python versions and quickly switch between. Maybe your system comes with an older version of Python. Instead of changing the system version, we can use pyenv.
If you’re familiar with the Node.js ecosystem, pyenv is similar to nvm.
To install it using Homebrew, we run
$ brew install pyenvOnce that’s installed, we have to add the required PATH variables and integration to our ~/.zshrc:
echo 'export PYENV_ROOT="$HOME/.pyenv"' >> ~/.zshrcecho '[[ -d $PYENV_ROOT/bin ]] && export PATH="$PYENV_ROOT/bin:$PATH"' >> ~/.zshrcecho 'eval "$(pyenv init -)"' >> ~/.zshrcWe can reload our shell using source ~/.zshrc or simply open up a new tab / terminal window.
$ pyenv --versionpyenv 2.4.10Sweet. Time to install a Python version of our choosing. We’ll go with 3.12 because that’s the current stable release.
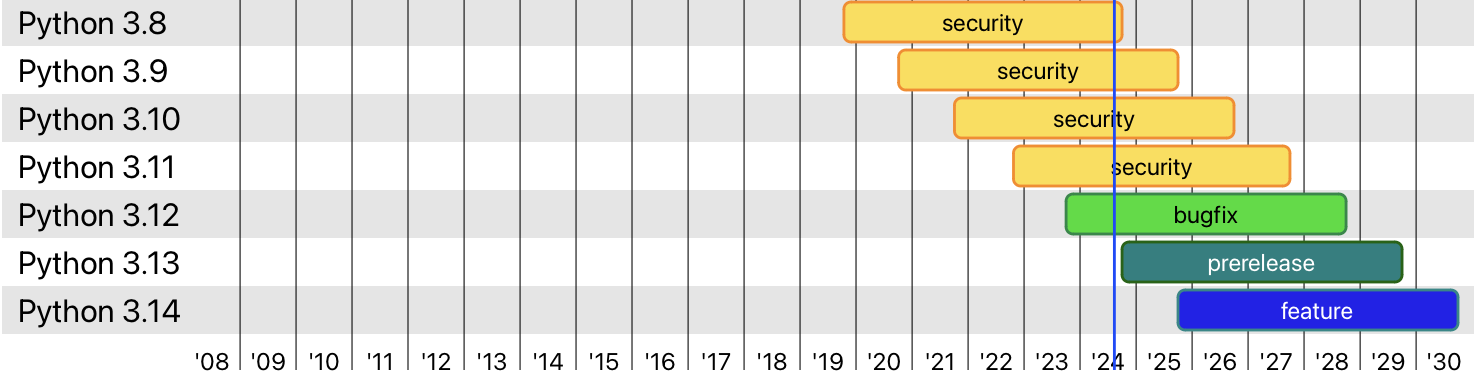
Status of Python versions on August 2024
Installing can take a little while, depending on your machine and internet connection.
$ pyenv install 3.12Installing Python-3.12.5......Installed Python-3.12.5 to /Users/jilles/.pyenv/versions/3.12.5Once this is installed, we can quickly check all available Python versions:
$ pyenv versions* system (set by ~/jilles/.pyenv/version) 3.12.5Before we continue, it is good to understand how pyenv decides which Python version to use. Remember we added export PATH="$PYENV_ROOT/bin:$PATH" in our .zshrc file? This added the pyenv /bin folder to your PATH. When we run any executable from the command line, the system will look at our PATH and resolve the executable (e.g. python) in directories starting from the left, if it can not find it, it will go to the next directory on the right, separated by a :. It will do this until it can’t find any more directories to check.
In the our $PYENV_ROOT/bin folder the is an executable named python. This is called a shim. It is not actually the same Python executable you would get from a system install. Instead, this shim will look at your current environment, and point you to the right Python version.
There are two main ways to select your Python version. The first one is “global” activation. In which you set your Python version regardless of current working directory:
$ pyenv global 3.12Now wherever you call which python, it’s always going to point to 3.12. Unless, you have a local version set.
The other type is “local” activation. This takes precedence over global activation. You can enable local activation by creating a .python-version file in any project. The fastest way of doing that is running:
$ pyenv local 3.12This will create a .python-version file with 3.12 in it. In that directory, and any child directory, our pyenv shim is going to see a .python-version file and activate that version. It might not seem like much, but it is very convenient when you have many different projects using various Python versions.
Let’s continue to create our Django project.
$ mkdir django-project && cd django-project$ pyenv local 3.12$ pyenv version3.12.5 (set by ~/jilles/django-project/.python-version)$ python --versionPython 3.12.5As you can see, pyenv version located the .python-version file and set our Python version! We can now continue to set up Poetry and install our dependencies.
If you are using another environment like Linux or Windows, follow the install instructions in the pyenv repository. The theory we covered here still applies. Only the installation instructions might be slightly different
Setting up Poetry
Poetry is a tool used for managing your Python dependencies. It replaces setup.py, requirements.txt, setup.cfg, MANIFEST.in and Pipfile that you might have seen in other Python projects with a single file: pyproject.toml. In the Node.js ecosystem, pyproject.toml is akin to package.json
We can install it simply by running:
$ curl -sSL https://install.python-poetry.org | pythonIf you don’t trust installations like this, you can find alternative install methods on the Poetry website. After the installation we can confirm by running
$ poetry --versionPoetry (version 1.8.3)In our django-project folder, we can initialize a new Poetry project. Poetry supports adding dependencies and development dependencies interactively, for this article we’ll skip that and use the command line.
We will initialize a new Poetry project using poetry init. There is also poetry new [project] but this creates a folder structure that we won’t use for our Django app. I always prefer creating a new folder, setting the Python version with pyenv local [version], and initialzing Poetry from there.
$ poetry initThis command will guide you through creating your pyproject.toml config.Package name [django-project]:Version [0.1.0]:Description []:Author [Jilles S <jilleswf@?.com>, n to skip]:License []:Compatible Python versions [^3.12]:
Would you like to define your main dependencies interactively? (yes/no) [yes] no...Do you confirm generation? (yes/no) [yes] yes
Poetry has now created a pyproject.toml. By default, it creates your project in package mode. This is great if you want to create a package to distribute on pypi.org, but we just want Poetry to manage our dependencies.
$ vim pyproject.toml...[tool.poetry]name = "django-project"version = "0.1.0"...package-mode = false # <- addedWith package-mode set to false, we can now easily install our dependencies:
$ poetry add Django==5.1Creating virtualenv django-project-6h_1nz6K-py3.12 in ~/jilles/Library/Caches/pypoetry/virtualenvs
Updating dependenciesResolving dependencies... (0.1s)
Package operations: 3 installs, 0 updates, 0 removals
  - Installing asgiref (3.8.1)  - Installing sqlparse (0.5.1)  - Installing django (5.1)
Writing lock file
A couple of important things happened with this one command.
1. Poetry created a virtual environment
Poetry created a virtual environment for you: Creating virtualenv django-project-6h_1nz6K-py3.12 in ~/jilles/Library/Caches/pypoetry/virtualenvs. This virtual environment is important. Imagine you wanted to start another project using Django 5.0 (instead of 5.1), without a virtual environment, you would overwrite the 5.1 installation.
In Node.js this is comparable to installing all packages using npm install [package] -g. You wouldn’t want that.
2. Poetry created poetry.lock
Poetry created a poetry.lock file. This is an automatically generated file that will update every time you add, change or remove dependencies. It should be checked-in to source control. This file makes sure that your dependencies, and your dependencies’ dependencies are consistent across installs.
In Node.js, this would be similar to a yarn.lock or package-lock.json file.
We are now ready to start our Django application!
Creating a new Django application
With our Python and Poetry environment set up, we can finally start our Django application.
We have to run all Python commands using the virtual environment Poetry created for us. The virtualenv-wrapper way of activating your virtual environment would be $ source ~/Library/Caches/pypoetry/virtualenvs/django-project-6h_1nz6K-py3.12/bin/activate… Thanksfully we use Poetry and can achieve the same by using poetry shell.
You can either activate your virtual environment by using poetry shell, or if you just want to run a single command, you can use poetry run. I usually activate the environment, but you don’t have to. Let’s start the project using poetry run. Then we’ll run the Django migrations and start the server using poetry shell.
$ poetry run django-admin startproject my_project .Notice the . at the end there is important. This created the project in the current directory.
We will apply the default migrations to our SQLite database with the tables Django needs for authentication, sessions and user management.
$ poetry shellSpawning shell within ...$ python manage.py migrateOperations to perform: Apply all migrations: admin, auth, contenttypes, sessionsRunning migrations: Applying contenttypes.0001_initial... OK ...$ python manage.py runserverDjango version 5.1, using settings 'my_project.settings'Starting development server at http://127.0.0.1:8000/Quit the server with CONTROL-C.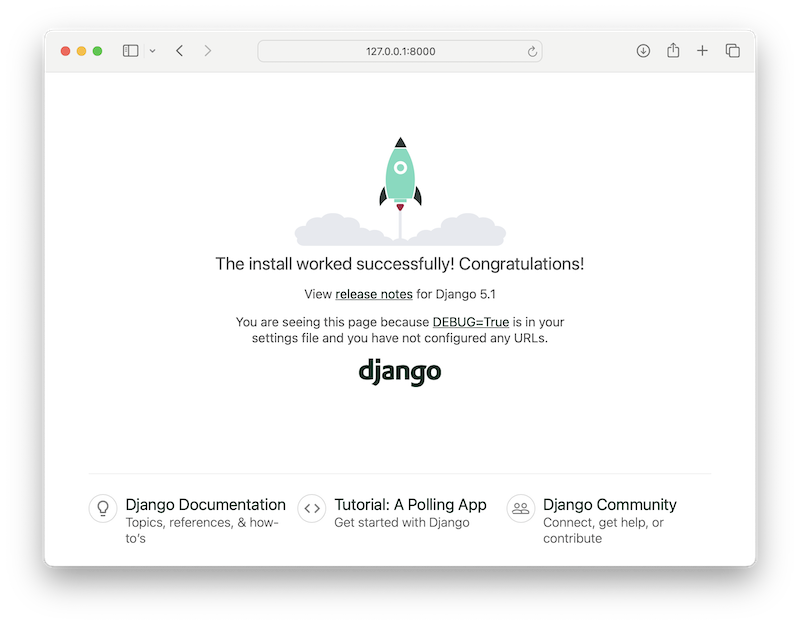
Django 5.1 running successfully
Done!
Hopefully you enjoyed this article. It should set you up for starting a Python/Django project using modern tools like pyenv and Poetry.
Poetry is a versatile tool that does many things we didn’t cover here. You should read the official Python Poetry docs if you want to dive deeper. My goal here was to help you get started and cover enough to not feel lost.