Mastering React, Redux, and React-Redux for Frontend Development
React and Redux are great. Once you get the basics it’s really easy to create very cool web apps. This is what I liked about Angular 1.x, you would read a small tutorial and be able to build an app within hours. React on the other hand - while also being quite easy to get into - is a bit harder.
In this post I will make a filterable list (comparable to Angular’s ng-repeat / ngFor). We’ll be making 3 versions in this specific order:
- React only
- React + Redux
- React + Redux + react-redux
Getting Started
Thanks to create-react-app it is now very easy to create a simple React app. We create a new React app running the following command in our terminal.
create-react-app filterable-listAfter you’ve created the app. Run npm start and open the src folder in your favourite editor. I use vim and because of that, I have to mention it.
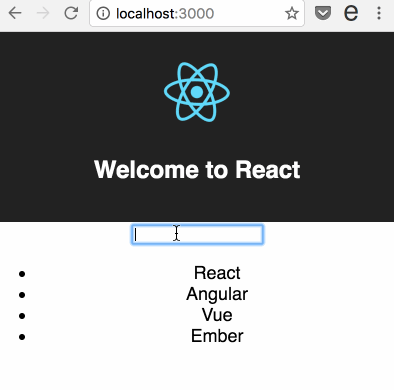
It will open the app’s page in your default browser and we are good to go!
React only
Cool, let’s work on our React only version. Before we start writing code we should think about the components we are going to write. In a filtered list you would expect 2 components. <FilteredList /> component that holds an input field (for the filter) and an actual list with items. <List items={frameworks} filterBy={what} /> will do!
We’ll replace the default message of create-react-app with our FilterList component to keep it simple.
<div className="App-intro"> <FilterList /></div>Our FilterList will be a “smart component” as it will have some state. The state will be filteredBy. We’ll have an input box that sets the state and then finally our List component with items and what to filter on.
class FilterList extends Component { constructor() { super(); // our default state, filter by nothing this.state = { filterBy: '' }; } // function that triggers on every change in the input box updateFilter(ev) { this.setState({ filterBy: ev.target.value }); } render() { const { filterBy } = this.state; const frameworks = ['React', 'Angular', 'Vue', 'Ember']; // simple input box and our List component return ( <div> <input type="text" onChange={(ev) => this.updateFilter(ev) }/> <List items={frameworks} filterBy={filterBy} /> </div> ) }}Ok, that shouldn’t look too daunting. All we need is our simple List component now. This one is a “dumb component” as it just displays the data given to it, nothing else. Because of this, we can make it a fancy stateless functional component.
const List = ({ items, filterBy }) => { return ( <ul> { items .filter(item => item.indexOf(filterBy) > -1) .map((item, i) => <li key={i}>{item}</li>) } </ul> )}This List component renders our list. If you have no clue what filter and map do, I suggest you check out my post about awesome JavaScript array methods.
Boom! This works.
The problem with this approach is that it works for this small example but not for anything more complex. What if you had multiple lists in different places? Those couldn’t access <FilteredList />’s state. It’s also not a very good idea to keep the different states of your components in the component itself. It will be super confusing and hard to have different components use the same state if they’re not direct children.
React + Redux
The dynamic duo. If you haven’t heard of Redux by now you have probably been living under a rock. It’s a is a state container for your JavaScript apps. Install it using:
npm install redux --saveOr if you’re cool, you should use yarn:
yarn add reduxWe’ll need to understand 3 things to get it working.
- Actions
- Reducers
- Store
Actions
Because our app functionality is so simple, we only need one action. An action is a plain JavaScript object, we’ll generate them with an Action Creator. Don’t worry about the fancy names. It’s just a function that returns a plain JavaScript object.
function setFilter(by) { return { type: 'SET_FILTER', by };}Note that we can use ES6 with create-react-app. So { by } actually is { by: by }
Now we have our Action Creator, it’s time to set up the reducer.
Reducer
So our reducer takes the current state and returns a new state depending on the action. The state can never be undefined so you should always give it a default state and always return some sort of state (never undefined).
Our simple reducer would look like this:
const initialState = {  filterBy: ''}
function reducer(state = initialState, action) {  switch (action.type) {    case 'SET_FILTER':      return Object.assign({}, state, {        filterBy: action.by      })    default:      return state  }}
Our initial state is exactly what our this.state = { ... } was in the FilterList component. Although from now on the store will keep track of it instead of our component itself.
You might notice the return Object.assign({}...). This is because Redux returns a new state every time. Not the same - edited - state from before. This is a core concept of Redux.
Store
The store is the easiest one to create. We need to import createStore from the redux package though. Add it using:
import { createStore } from 'redux'Now to creating our store is surprisingly easy:
const store = createStore(reducer);Wiring it together
Alright, I have the Action Creator, the Reducer and the Store in the same file just because it’s easier for now. Normally you want to import and export those in different files to keep it nice and tidy.
First we want to remove the static state from our FilterList component and get it from the store.
We also need to subscribe to the store for any changes so that we can update the state again to re-render our component (with the updated filteredBy)
Our constructor() from the FilterList will now look like:
constructor() { super(); // default state this.state = store.getState(); // function that will execute every time the state changes this.unsubscribe = store.subscribe(() => { this.setState(store.getState()); });}You may wonder what the this.unsubscribe does. And right now it does nothing. We need to call that function when our component gets unmounted to stop listening to the store and prevent memory leaks.
We also add:
componentWillUnmount() { this.unsubscribe();}So when the component gets unmounted (say, you navigate to a different page in your app), the store won’t care anymore.
The last thing to update is our updateFilter() function. All it did was this.setState({ filterBy: ev.target.value });. But as you know by now, we keep the state in the store so we need to update the store somehow… With actions!
Let’s update it:
updateFilter(ev) { store.dispatch(setFilter(ev.target.value));}Wooohooo! It works!
React, Redux and react-redux
At this point I wondered why would I want to use react-redux? It works just fine without it. The answer is simple, it just takes away some of the boilerplate and does some really nice optimizations.
With react-redux you won’t have to define componentWillUnmount on all components that listen to the store. Even better, you won’t have to do this.state = {...} in the constructor anymore.
Let’s install it using npm / yarn:
yarn add react-reduxWe only need two things for this simple functionality from react-redux. The connect function and the Provider component.
import { Provider, connect } from 'react-redux';The Provider component “provides” the store for our app so you can “connect” to it using connect().
To add the provider we just wrap our current app in our Provider component like so:
<Provider store={store}> <div className="App"> ... </div></Provider>Finally we need to connect our component to the store. We do this using the connect() function that we imported from react-redux. It takes 2 arguments and returns a function in which we pass our component.
The first argument is mapStateToProps where we define what state to map to the props of our component:
const mapStateToProps = (state) => { return { filterBy: state.filterBy }}What this effectively does is add filterBy to the props of our component, rather than this.state like we did before.
The second argument is mapDispatchToProps which - as the name suggests - maps our dispatcher to our props.
const mapDispatchToProps = (dispatch) => { return { updateFilter: (ev) => dispatch(setFilter(ev.target.value)) }}Let’s wire it up now:
class FilterList extends Component { render() { // this comes from the props now rather than the state const { filterBy, updateFilter } = this.props; return ( <div> <input type="text" onChange={updateFilter}/> <List items={ITEMS} filterBy={filterBy} /> </div> ) }}// very important!FilterList = connect(mapStateToProps, mapDispatchToProps)(FilterList);See that we completely removes the constructor() to set the state? That’s what mapStateToProps did. Notice how we also removed that updateFilter() { ...}? That’s what mapDispatchToProps did!
That’s it
I hope this post made React + Redux with react-redux a little more clear to you without the use of a Todo app example. The complete complete App.js is available as gist on GitHub
If you liked this (or not) don’t hesitate to message me on Twitter @Jilles.