Cloudflare Workers, SvelteKit, Drizzle, and D1: Up and Running.
It’s incredible what you can do for free today. In this article, we’ll set up a SvelteKit application that runs on Cloudflare’s Edge using Cloudflare Workers. It will have a fully functioning database connection to D1 that we’ll query with Drizzle. There are no servers for you to manage, no containers to deploy, and the application will be fast from anywhere in the world.
About the Stack
What’s so special about this stack? Why not just build a Docker container and ship it to any of the PaaS platforms? One major reason is that we can do this for free. Really, for free! Let’s explore the stack:
Cloudflare Workers
This is the heart of our stack. Cloudflare Workers are a “serverless” platform where you provide your application (e.g. a SvelteKit app) and they will run it for you across the globe. There are servers, you just don’t manage them. Therefore it’s serverless, for you.
At the time of writing, you get 100,000 requests per day for free. There are some limits, such as the 10ms execution time, but we won’t hit those too easily.
Cloudflare D1
If Workers are the heart, D1 is part of the brain. Specifically the memory. It’s Cloudflare’s serverless database with SQLite-like semantics. It pairs really well with Cloudflare Workers.
Currently you get 100,000 writes and 5,000,000 reads per day, for free.
Svelte and SvelteKit
Svelte is in my opinion, one of the best frameworks out there. According to the 2024 Stack Overflow survey, 73% of developers that used it want to keep working with Svelte. That’s the highest of all JavaScript web frameworks.
It compiles to highly optimized JavaScript, so you’re not actually shipping a vendor library as you would with React. SvelteKit adds server side capabilities such as server side rendering (SSR) and data fetching. This is what we will be shipping to our Cloudflare Worker using the SvelteKit Cloudflare Adapter.
This article will be mostly about deploying a SvelteKit application to Cloudflare Workers, and not a guide on Svelte/SvelteKit. I highly recommend going through the interactive tutorial if you haven’t used Svelte yet.
Drizzle (and Drizzle Kit)
Drizzle is a TypeScript ORM. It has no dependencies so is perfect for serverless environments. This is what we’ll use to query/write to our D1 database inside of our SvelteKit application.
It also comes with Drizzle Kit, which is what we will use for SQL migrations. With this we can evolve our database schema over time, without writing SQL ourselves.
Prerequisites
If you want to follow along, you will need a Cloudflare account (free). You’ll also need a Node.js environment installed locally. I will be using pnpm as Node’s package manager, but you can use npm or yarn if you prefer.
Here we go!
Creating the application
Creationg the application is incredibly simple thanks to the Svelte CLI
$ pnpm create cloudflare@latest svelte-guestbook --framework=svelte --platform=workersWe’ll choose the following options:
- Template: SvelteKit minimal (barebones scaffolding for your new app)
- TypeScript: Yes
- Dependencies: (do not choose sveltekit-adapter!)
- drizzle
- SQLite
- LibSQL
- drizzle
- Package manager: pnpm
- Use git: Yes
- Deploy: No (not yet!)
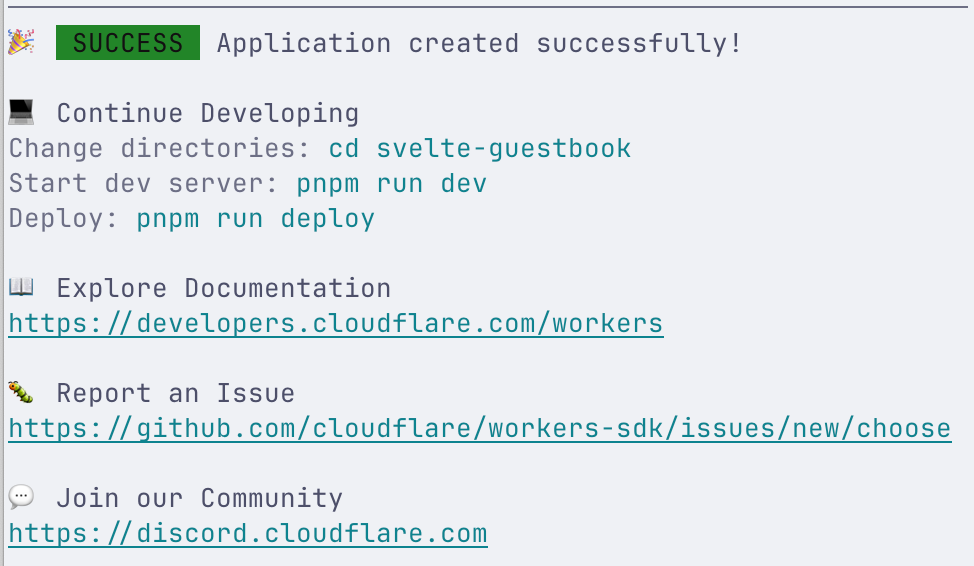
Figure 1. Worker Application Created!
Does this means we’re ready to go? Almost. Let’s make sure we have the latest dependencies.
(svelte-guestbook) $ pnpm outdated┌──────────────────────────────┬─────────┬────────┐│ Package │ Current │ Latest │├──────────────────────────────┼─────────┼────────┤│ @sveltejs/adapter-auto (dev) │ 4.0.0 │ 6.0.0 │├──────────────────────────────┼─────────┼────────┤│ @libsql/client │ 0.14.0 │ 0.15.2 │├──────────────────────────────┼─────────┼────────┤│ drizzle-orm │ 0.40.1 │ 0.41.0 │└──────────────────────────────┴─────────┴────────┘The Svelte CLI comes with the @sveltejs/adapter-auto, but the Cloudflare CLI (steps 5 and 6) added the latest adapter. Time to clean it up:
$ pnpm remove @sveltejs/adapter-auto...devDependencies:- @sveltejs/adapter-auto 4.0.0
$ pnpm upgrade @libsql/client@0.15.2 drizzle-orm@0.41.0Packages: +5...dependencies:- @libsql/client 0.14.0+ @libsql/client 0.15.2- drizzle-orm 0.40.1+ drizzle-orm 0.41.0
We can now successfully run our SvelteKit application locally using pnpm dev.
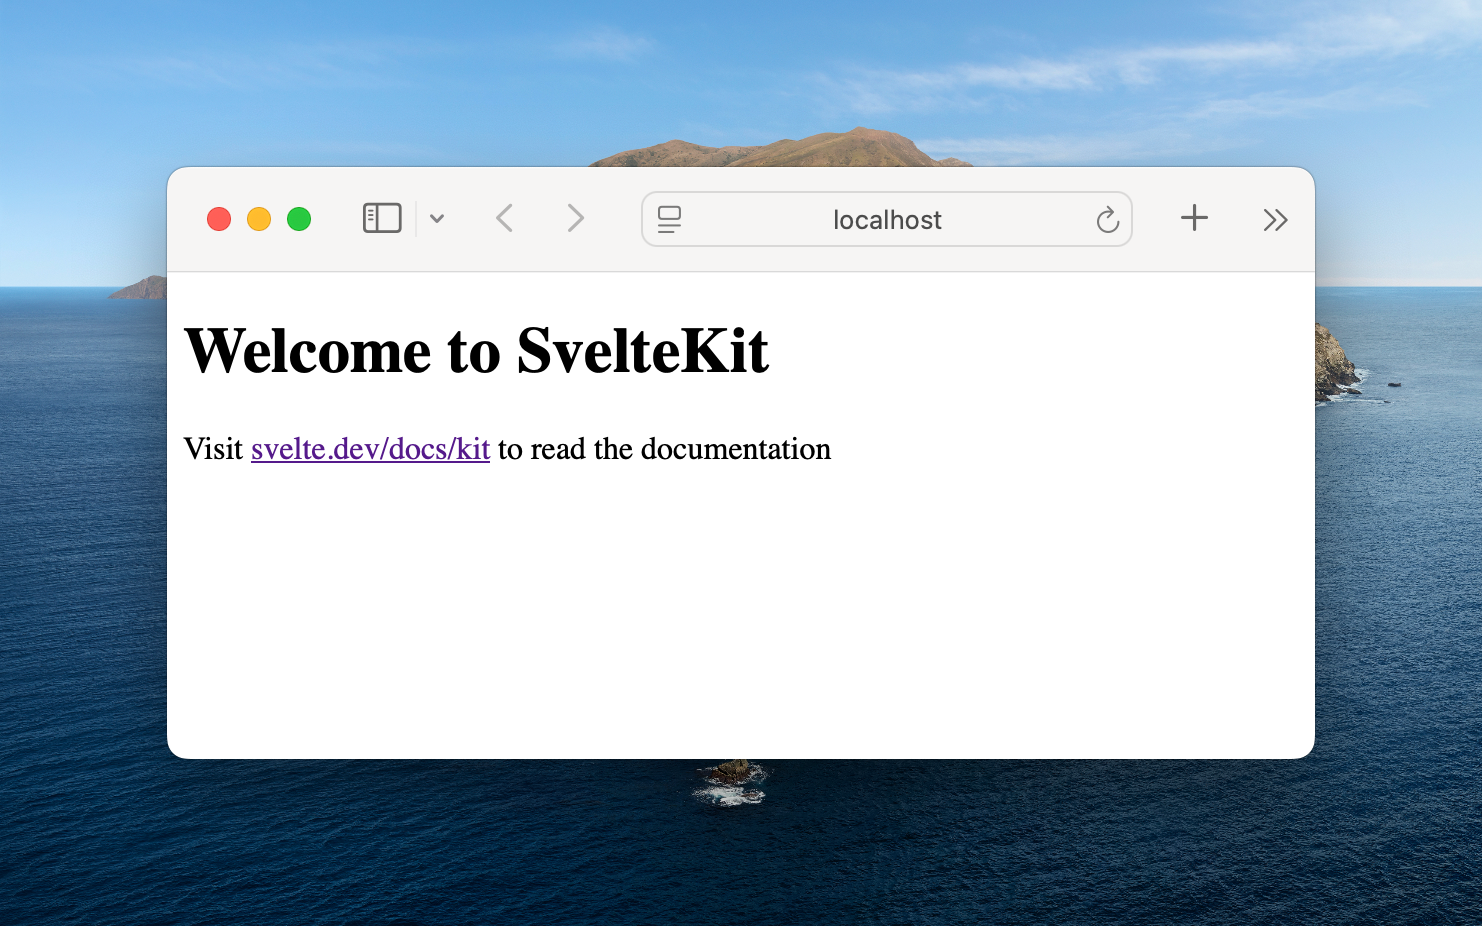
Figure 2. Running Locally.
This is great for development, but we want to make a few more changes before we can consider this “ready to push to Cloudflare”.
Environments
Before pushing to Cloudflare we need to understand the environments we are working with. At a high level there are 3.
1 - Local Development
Our local development. It requires no internet connection. This does not run inside a Cloudflare Worker. You can not access the Cloudflare Bindings here (e.g. D1 SQLite, as we’ll see later). This is where we’ll do most of our development. It uses the vite development server for module reloading. It does not use wrangler (Cloudflare Workers CLI tool)
2 - Local Preview (Miniflare)
With Wrangler you can spin up a full Cloudflare Worker simulator called miniflare. When you do this, you can access your Cloudflare Bindings but they’re all stored locally. The downside of this is that it requires a full build to see changes. Cloudflare calls this local development. It’s the correct terminology, because everything is running locally.
3 - Remote (production*)
Finally there is remote. I added production with an asterisk because you can deploy different environments to remote Cloudflare Workers too. You’d usually use this for your main production code. This gets pushed to Cloudflare’s Edge network and ran on their servers all across the world.
Deploying a Worker
We’ve set up our local development server and seen the 3 environments. Local development works, but can we push this to a Cloudflare Worker? Let’s try running our “Welcome to SvelteKit” application using wrangler dev.
Actually, we won’t be running wrangler commands ourselves until a little later in this article. For now, we can use the scripts defined in package.json. They were created by the Cloudflare CLI when we initially created the application:
"scripts": { "dev": "vite dev", "build": "vite build", "preview": "pnpm run build && wrangler dev", "prepare": "svelte-kit sync || echo ''", "check": "svelte-kit sync && svelte-check --tsconfig ./tsconfig.json", "check:watch": "svelte-kit sync && svelte-check --tsconfig ./tsconfig.json --watch", "db:push": "drizzle-kit push", "db:migrate": "drizzle-kit migrate", "db:studio": "drizzle-kit studio", "deploy": "pnpm run build && wrangler deploy", "cf-typegen": "wrangler types && mv worker-configuration.d.ts src/" },Let us begin by running a local preview using miniflare.
Running in Miniflare
$ pnpm previewvite v6.2.5 building SSR bundle for production...✓ 171 modules transformed.vite v6.2.5 building for production...✓ 133 modules transformed.> Using @sveltejs/adapter-cloudflare  ✔ done
 ⛅️ wrangler 4.7.2------------------
Your Worker and resources are simulated locally via Miniflare. For more information, see: https://developers.cloudflare.com/workers/testing/local-development.
Your worker has access to the following bindings:- Assets:  - Binding: ASSETS▲ [WARNING] The package "node:async_hooks" wasn't found on the file system but is built into node.
  Your Worker may throw errors at runtime unless you enable the "nodejs_compat" compatibility flag.  Refer to https://developers.cloudflare.com/workers/runtime-apis/nodejs/ for more details. Imported  from:   - .svelte-kit/output/server/index.js
⎔ Starting local server...[wrangler:inf] Ready on http://localhost:8787[mf:inf] ✨ Parsed 2 valid header rules.╭──────────────────────────────────────────────────────────────────────────────────────────────────╮│  [b] open a browser, [d] open devtools, [l] turn off local mode, [c] clear console, [x] to exit  │╰────────────────────────────────────────────────────────────────────────────────────────────────
Wow there is a lot going on. First we ran a build. This created all the artifacts necessary for the SvelteKit application to run in Cloudflare Worker.
The warning looks a little worrying. SvelteKit makes use of Node.js’ AsyncLocalStorage. Cloudflare Workers run Cloudflare’s own runtime different from Node.js. Lucky for us they support a lot of Node.js APIs. In order to be able to use AsyncLocalStorage (and others) we just need to enable the nodejs_compat flag.
Let’s update our wrangler.jsonc file:
{ "$schema": "node_modules/wrangler/config-schema.json", "name": "svelte-guestbook", "main": ".svelte-kit/cloudflare/_worker.js", "compatibility_date": "2025-04-06", "compatibility_flags": ["nodejs_compat"], // NEW! "assets": { "binding": "ASSETS", "directory": ".svelte-kit/cloudflare" },This instructs our Cloudflare Worker environment to include their implementation of the Node.js APIs they support.
Let’s re-run our preview using pnpm preview. This time there won’t be any errors and you can open http://localhost:8787 to see it in action.
If you make any changes though, it won’t automatically reload. We effectively ran vite build to build our assets, and wrangler dev to run it in a miniflare environment.
Now that we know it works as a preview. We can be pretty confident it will run as a Cloudflare Worker too!
Deploying to Cloudflare
What is really cool is that we can now deploy our application to Clouflare Workers already. Did I mention for free! It is just a simple “Welcome to SvelteKit” display. Could it be this easy?
$ pnpm run deploy> svelte-guestbook@0.0.1 deploy /svelte-guestbook> pnpm run build && wrangler deploy...Uploaded 12 of 12 assets✨ Success! Uploaded 12 files (1.22 sec)
Total Upload: 249.68 KiB / gzip: 58.06 KiBWorker Startup Time: 23 msYour worker has access to the following bindings:- Assets:  - Binding: ASSETSUploaded svelte-guestbook (6.35 sec)Deployed svelte-guestbook triggers (0.82 sec)  https://svelte-guestbook.bold-sea-1f51.workers.devCurrent Version ID: 494880f5-c149-4f39-969a-4fbe30b48ff6
Figure 3. It works!
In your Cloudflare Dashboard under Workers & Pages, you should now see your application.
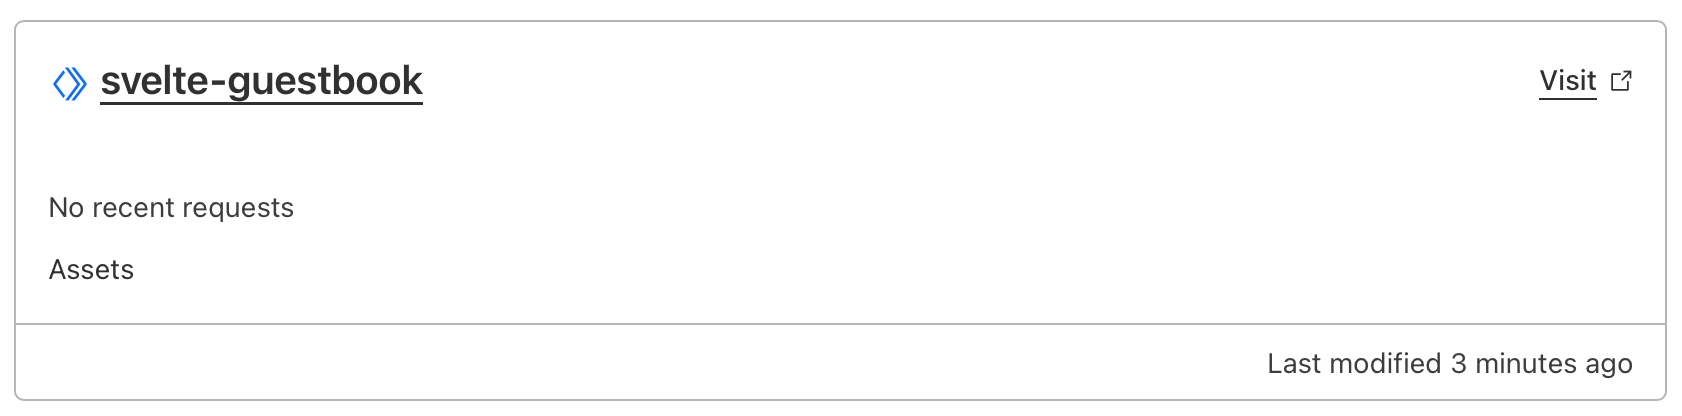
Figure 4. Deployed to Cloudflare.
Adding SQLite with Drizzle ORM
Okay, we’ve deployed the most basic SvelteKit application to Cloudflare Workers. Hardly something to write about (…).
Next we will create a simple guestbook. It will take a user’s name and message. Since we used the Svelte CLI and selected Drizzle. We already have a config and schema.
- drizzle.config.ts
- src/lib/server/db/schema.ts
Let’s make a one-table guestbook. Open up src/lib/server/db/schema.ts and remove the default “user” table. We will have one simple table called “guestbook_messages”.
import { sqliteTable, text, integer } from 'drizzle-orm/sqlite-core';import { sql, type InferSelectModel } from 'drizzle-orm';
export const guestbookMessages = sqliteTable('guestbook_messages', {  id: integer().primaryKey(),  name: text().notNull(),  message: text().notNull(),  country: text(),  createdAt: text('created_at', { mode: 'text' })    .notNull()    .default(sql`CURRENT_TIMESTAMP`),});
export type GuestBookMessage = InferSelectModel<typeof guestbookMessages>
Great. Next up we’ll have to create the migrations.
Drizzle Kit comes with a way to automatically push your schema to your database using drizzle-kit push. If you remember our scripts, this is also the default provided by the Cloudflare CLI.
It works fine, but you lose the benefit of tracking your migrations in source control! Therefore we’ll replace db:push with db:make-migrations inside our package.json
"db:push": "drizzle-kit push","db:make-migrations": "drizzle-kit generate",This will create migrations in our folder of choice. We’ll need to update drizzle.config.ts to point to our new migrations folder. If it doesn’t exist, drizzle will create it when we run db:make-migrations.
import { defineConfig } from 'drizzle-kit';
if (!process.env.DATABASE_URL) throw new Error('DATABASE_URL is not set');
export default defineConfig({  schema: './src/lib/server/db/schema.ts',  // NEW:  out: './src/lib/server/db/migrations',
  dbCredentials: {    url: process.env.DATABASE_URL  },
  verbose: true,  strict: true,  dialect: 'sqlite'});
Now we can make our migration files:
$ pnpm run db:make-migrations> svelte-guestbook@0.0.1 db:make-migrations /svelte-guestbook> drizzle-kit generate
No config path provided, using default 'drizzle.config.ts'Reading config file '/svelte-guestbook/drizzle.config.ts'1 tablesguestbook_messages 5 columns 0 indexes 0 fks
[✓] Your SQL migration file ➜ src/lib/server/db/migrations/0000_messy_forge.sql 🚀
It created an SQL file containing our schema:
CREATE TABLE `guestbook_messages` ( `id` integer PRIMARY KEY NOT NULL, `name` text NOT NULL, `message` text NOT NULL, `country` text, `created_at` text DEFAULT CURRENT_TIMESTAMP NOT NULL);Now we can apply our migrations to our local database. This will be in local.db. As specified by the .env file: DATABASE_URL=file:local.db created by the CLI.
pnpm run db:migrate
> svelte-guestbook@0.0.1 db:migrate /svelte-guestbook> drizzle-kit migrate
No config path provided, using default 'drizzle.config.ts'Reading config file '/svelte-guestbook/drizzle.config.ts'[✓] migrations applied successfully!%
We can now create a very simple guestbook application that will show messages in our guestbook and allow users to post them.
Minimal SvelteKit Guestbook
To show our SQLite and Drizzle set-up working. we’ll need 2 things. The server needs to load messages and be able to create new ones. The client needs to display them and allow posting them.
Luckily all this can be achieved using 2 core SvelteKit concepts: loading data and form actions. However, this article’s main focus is deploying a SvelteKit application to Cloudflare Workers, so I wont go into depth on Svelte/SvelteKit.
We’ll begin by creating our +page.server.ts file, this will only run on the server (Cloudflare Workers).
import type { Actions, PageServerLoad } from './$types';import { db } from '$lib/server/db';import { guestbookMessages } from '$lib/server/db/schema';import { desc } from 'drizzle-orm';
export const load: PageServerLoad = async () => {    const messages = await db.select().from(guestbookMessages).limit(10).orderBy(desc(guestbookMessages.createdAt));    return {        messages,    };};
export const actions: Actions = {    default: async ({ request, platform }) => {        const formData = await request.formData();        const name = formData.get('name');        const message = formData.get('message');        const country = platform?.cf?.country ?? 'Unknown';
        await db.insert(guestbookMessages).values({            name: name as string,            message: message as string,            country: country as string        });
        return { success: true };    }}
A few things to notice. First, we already have db available to use because of the SveteKit CLI.
Next, we use platform in our save action. This is made available by Cloudflare Adapter for SvelteKit. Locally this will be filled with emulated data created by Miniflare, but in your Cloudflare Workers it will be real data.
Now we just need a Svelte component:
<script lang="ts">  import type { PageProps } from "./$types";  import { enhance } from "$app/forms";
  let { data }: PageProps = $props();
  let name = $state('');  let message = $state('');  let characterCount = $derived(message.length);
</script><h1>Welcome to SvelteKit</h1><p>Visit <a href="https://svelte.dev/docs/kit">svelte.dev/docs/kit</a> to read the documentation</p>
<div>  {#each data.messages as message}    <div class="message">      <h3>{message.name} ({message.country})</h3>      <p>{message.message}</p>      <span class="date">Posted on {message.createdAt}</span>    </div>  {:else}    <p>No messages yet</p>  {/each}</div>
<hr>
<form method="post" use:enhance>    <div>      <label for="name">Name</label>      <input id="name" type="text" bind:value={name} name="name" />    </div>    <div>      <label for="msg">Message</label>      <textarea id="msg" bind:value={message} name="message"></textarea>      <span class="count">{characterCount} characters</span>    </div>    <button type="submit" disabled={characterCount < 5}>Post</button></form>
We created a form that takes a name and message. SvelteKit will take care of the rest.
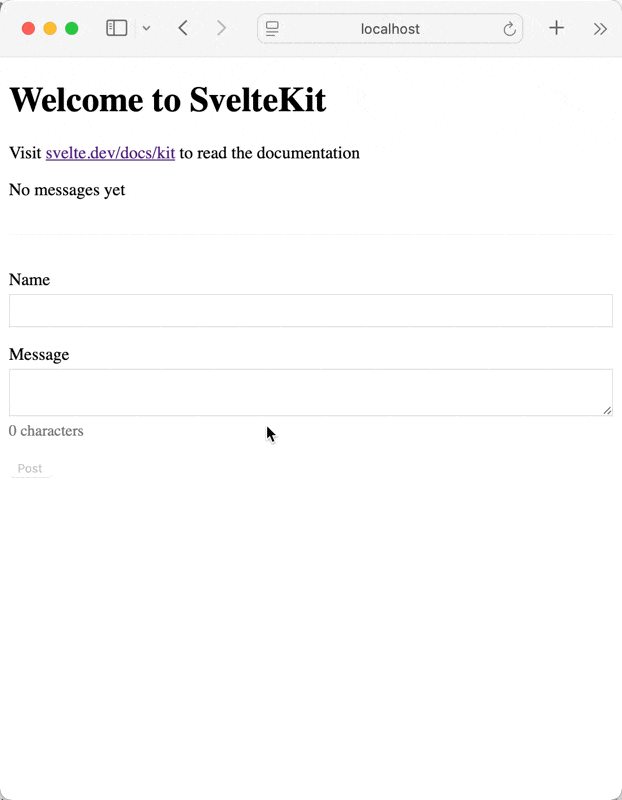
Figure 5. Persisting our message
It works! Now let’s try this inside a Cloudflare Worker. Time to run pnpm run preview. And…

Figure 6. Miniflare
Looking at the CLI output it’s pretty clear:
[wrangler:inf] Ready on http://localhost:8787⎔ Starting local server...[mf:inf] ✨ Parsed 2 valid header rules.✘ [ERROR] Error: DATABASE_URL is not setThis is because the SQLite database connection works for local SQLite databases, not one provided by Cloudflare’s D1. Let’s fix that!
Drizzle 🤝 Cloudflare D1
Most of what we wrote up until this point is relevant for our local development server. We need to make a few changes for our application to work in Cloudflare Workers.
- Set up a D1 database using Wrangler
- Run our migrations against the new database
- Connect Drizzle to our D1 Database
- Update our TypeScript types to support D1 and LibSQL
- Use our new database
- Deploy!
Creating a D1 database is incredibly easy using Wrangler:
$ wrangler d1 create guestbook-db
 ⛅️ wrangler 4.7.2------------------
✅ Successfully created DB 'guestbook-db' in region WNAMCreated your new D1 database.
{  "d1_databases": [    {      "binding": "DB",      "database_name": "guestbook-db",      "database_id": "68dbaf37-6e35-275a-91e4-50ce713719a9"    }  ]}
That created a D1 database for us. You can verify this in your Cloudflare Dashboard under Storage & Databases.
That’s the first step out of the way. Next we’ll add the output from our wrangler command to our wrangler.jsonc file. There is a section around bindings. Add d1_databases to it:
/** * Bindings * Bindings allow your Worker to interact with resources on the Cloudflare Developer Platform, including * databases, object storage, AI inference, real-time communication and more. * https://developers.cloudflare.com/workers/runtime-apis/bindings/ */ "d1_databases": [ { "binding": "DB", "database_name": "guestbook-db", "database_id": "68dbaf37-6e35-275a-91e4-50ce713719a9", "migrations_dir": "./src/lib/server/db/migrations" } ]We added the migrations_dir ourself. This is important for step 2, run our migrations against the new database. It’s important to note the binding value here. It is currently DB. This means that it will be available on platform.env.DB in Cloudflare Workers. If you changed the binding name to DATABASE, it would be platform.env.DATABASE.
Now we’ll run the migrations. Since we created .SQL migrations using db:make-migrations earlier, we can now easily apply them using Wrangler:
$ wrangler d1 migrations apply guestbook-db ⛅️ wrangler 4.7.2------------------
Migrations to be applied:┌──────────────────────┐│ name                 │├──────────────────────┤│ 0000_messy_forge.sql │└──────────────────────┘✔ About to apply 1 migration(s)Your database may not be available to serve requests during the migration, continue? … yes🌀 Executing on local database guestbook-db (68dbaf37-6e35-275a-91e4-50ce713719a9) from .wrangler/state/v3/d1:🌀 To execute on your remote database, add a --remote flag to your wrangler command.🚣 2 commands executed successfully.┌──────────────────────┬────────┐│ name                 │ status │├──────────────────────┼────────┤│ 0000_messy_forge.sql │ ✅     │└──────────────────────┴────────┘
Wrangler created our database locally. As noted by the “To execute on your remote database, add a —remote flag to your wrangler command.”.
We can continue working on our Cloudflare Worker without pushing anything to our remote. Once we have it working using Miniflare (Wrangler dev), we can deploy it.
So far, we have created our database and applied migrations to it. Now it’s time to connect Drizzle to D1. Let’s take a look at the default implementation:
import { drizzle } from 'drizzle-orm/libsql';import { createClient } from '@libsql/client';import { env } from '$env/dynamic/private';if (!env.DATABASE_URL) throw new Error('DATABASE_URL is not set');const client = createClient({ url: env.DATABASE_URL });export const db = drizzle(client);Aha! if (!env.DATABASE_URL) throw new Error('DATABASE_URL is not set'); That’s what threw our preview off earlier. In a Cloudflare Worker context, we don’t have a DATABASE_URL. It’s not as simple as just passing a different URL. We need to use the D1 binding.
In a traditional Node.js application, you have a long running process. You can initialize db once, and use it for the lifetime of the application.
In a Cloudflare Worker, you only get the request lifecycle. Connecting to Drizzle to D1 needs to happen on every request. Let’s change the implementation to support our local database file when using pnpm dev, but use Cloudflare Workers when running in Miniflare or an actual worker.
We’ll need a LibSQL client for local development and a D1 client for Miniflare / Cloudflare Workers:
import { drizzle as drizzleLibSql, type LibSQLDatabase } from 'drizzle-orm/libsql';import { drizzle as drizzleD1, type DrizzleD1Database } from 'drizzle-orm/d1';import { createClient } from '@libsql/client';import * as schema from './schema';
export function createLibSqlClient(url: string): LibSQLDatabase<typeof schema> {    const client = createClient({ url });    return drizzleLibSql(client);}
export function createD1Client(database: D1Database): DrizzleD1Database<typeof schema> {    return drizzleD1(database);}
export type DrizzleClient = ReturnType<typeof createLibSqlClient> | ReturnType<typeof createD1Client>;
Step 1, 2 and 3 complete. Now we need to make SvelteKit aware of our database. The best way to do this is in hooks. More specifically locals.
Before we can do that though, we need to make sure our project knows we have a database available. The SvelteKit CLI created the following app.d.ts for us:
// See https://svelte.dev/docs/kit/types#app.d.ts// for information about these interfacesdeclare global {  namespace App {        interface Platform {            env: Env            cf: CfProperties            ctx: ExecutionContext        }    }}
export {};
This works, but we want to be more specific. Luckily the Cloudflare CLI made this easy for us by adding a script to package.json called “cf-typegen”. Let’s run it.
$ pnpm run cf-typegen...Generating project types...
declare namespace Cloudflare {        interface Env {                DB: D1Database;                ASSETS: Fetcher;        }}interface Env extends Cloudflare.Env {}
Generating runtime types...
Runtime types generated.
────────────────────────────────────────────────────────────✨ Types written to worker-configuration.d.ts
Action required Migrate from @cloudflare/workers-types to generated runtime types`wrangler types` now generates runtime types and supersedes @cloudflare/workers-types.You should now uninstall @cloudflare/workers-types and remove it from your tsconfig.json.
Action required Install @types/nodeSince you have the `nodejs_compat` flag, you should install Node.js types by running "npm i --save-dev @types/node".
This created a worker-configration.d.ts file that has extensive types for the Cloudflare Worker environment. We’ll just have to fix the 2 action items:
$ pnpm remove @cloudflare/workers-types$ pnpm install -D @types/nodeAnd remove the types: [...] from our tsconfig:
{ "extends": "./.svelte-kit/tsconfig.json", "compilerOptions": { ... "moduleResolution": "bundler",- "types": [- "@cloudflare/workers-types/2023-07-01"- ] }The previous types is why we could do platform?.cf?.country earlier in the form action. However, with pnpm run cf-codegen, we created types specific to our wrangler.jsonc file. This means that TypeScript will know that we will have a DB binding.
Let’s put it all together by adding our newly generated types and specifying our database in app.d.ts:
/// <reference types="./worker-configuration" />import type { DrizzleClient } from "$lib/server/db";// See https://kit.svelte.dev/docs/types#app// for information about these interfaces
declare global {  namespace App {        interface Platform {            env: Env            cf: CfProperties            ctx: ExecutionContext        }        interface Locals {            db: DrizzleClient        }    }}
export {};
There is once again a lot going on. We have added a few things:
/// <reference types="./worker-configuration" />is a triple slash directive that tells the TypeScript compiler to reference it. When we then look forEnv, it will use the one we generated usingcf-typegenimport type { DrizzleClient } from "$lib/server/db"imports our union type we exported earlier. Either a LibSQL or D1 type.db: DrizzleClienton ourLocalstells the TypeScript compiler to expect the client onlocals.db.
Now we need to instantiate our database like we said earlier, in hooks.server.ts:
import type { Handle } from '@sveltejs/kit';import { env } from '$env/dynamic/private';import { createD1Client, createLibSqlClient } from '$lib/server/db';
const db = env.DATABASE_URL ? createLibSqlClient(env.DATABASE_URL) : null;
export const handle: Handle = async ({ event, resolve }) => {    if (event.platform?.env.DB) {        event.locals.db = createD1Client(event.platform.env.DB);    } else if (db) {        event.locals.db = db;    } else {        throw new Error('No database found');    }
  const response = await resolve(event);  return response;};
This way, if there is a DB on platform.env, we’ll use that. Otherwise, if there is a DATABASE_URL, we’ll use that. Instantiated outside of our handle() function, like the initial db from the CLI.
Lastly we’ll update the server to use our locals.db instead of imported db:
import type { Actions, PageServerLoad } from './$types';import { guestbookMessages } from '$lib/server/db/schema';import { desc } from 'drizzle-orm';
export const load: PageServerLoad = async ({ locals }) => {    const messages = await locals.db.select().from(guestbookMessages).limit(10).orderBy(desc(guestbookMessages.createdAt));    return {        messages,    };};
export const actions: Actions = {    default: async ({ request, platform, locals }) => {        // ...        await locals.db.insert(guestbookMessages).values({            name: name as string,            message: message as string,            country: country as string        });
        return { success: true };    }}
Now with these changes, we should be able to run pnpm preview without errors! Indeed we can. I could show it to you but it looks identical to our development server. Let’s just deploy!
Deploying our Worker
We’ve got it working locally and in Miniflare. The only thing that’s left is to deploy our worker! We’ll need to do 2 things, none will come as a surprise to you
- Run the migrations on
remote - Deploy!
If you’ll recall earlier we ran the migrations, but did not specify a --remote flag. The migrations ran, but they ran against our Miniflare D1 database. Let’s run it against remote now.
$ wrangler d1 migrations apply guestbook-db --remote...🚣 Executed 2 commands in 0.2801ms┌──────────────────────┬────────┐│ name │ status │├──────────────────────┼────────┤│ 0000_messy_forge.sql │ ✅ │└──────────────────────┴────────┘And finally, the moment we’ve all been waiting for, deployment:
$ pnpm run deploy...✨ Success! Uploaded 13 files (1 already uploaded) (1.18 sec)
Total Upload: 683.12 KiB / gzip: 128.82 KiBWorker Startup Time: 12 msYour worker has access to the following bindings:- D1 Databases:  - DB: guestbook-db (68dbaf37-6e35-275a-91e4-50ce713719a9)- Assets:  - Binding: ASSETSUploaded svelte-guestbook (6.55 sec)Deployed svelte-guestbook triggers (0.51 sec)  https://svelte-guestbook.bold-sea-1f51.workers.devCurrent Version ID: 56a22638-d1f0-4d9c-80c6-2ad56cf41d7f
And of course, it works!
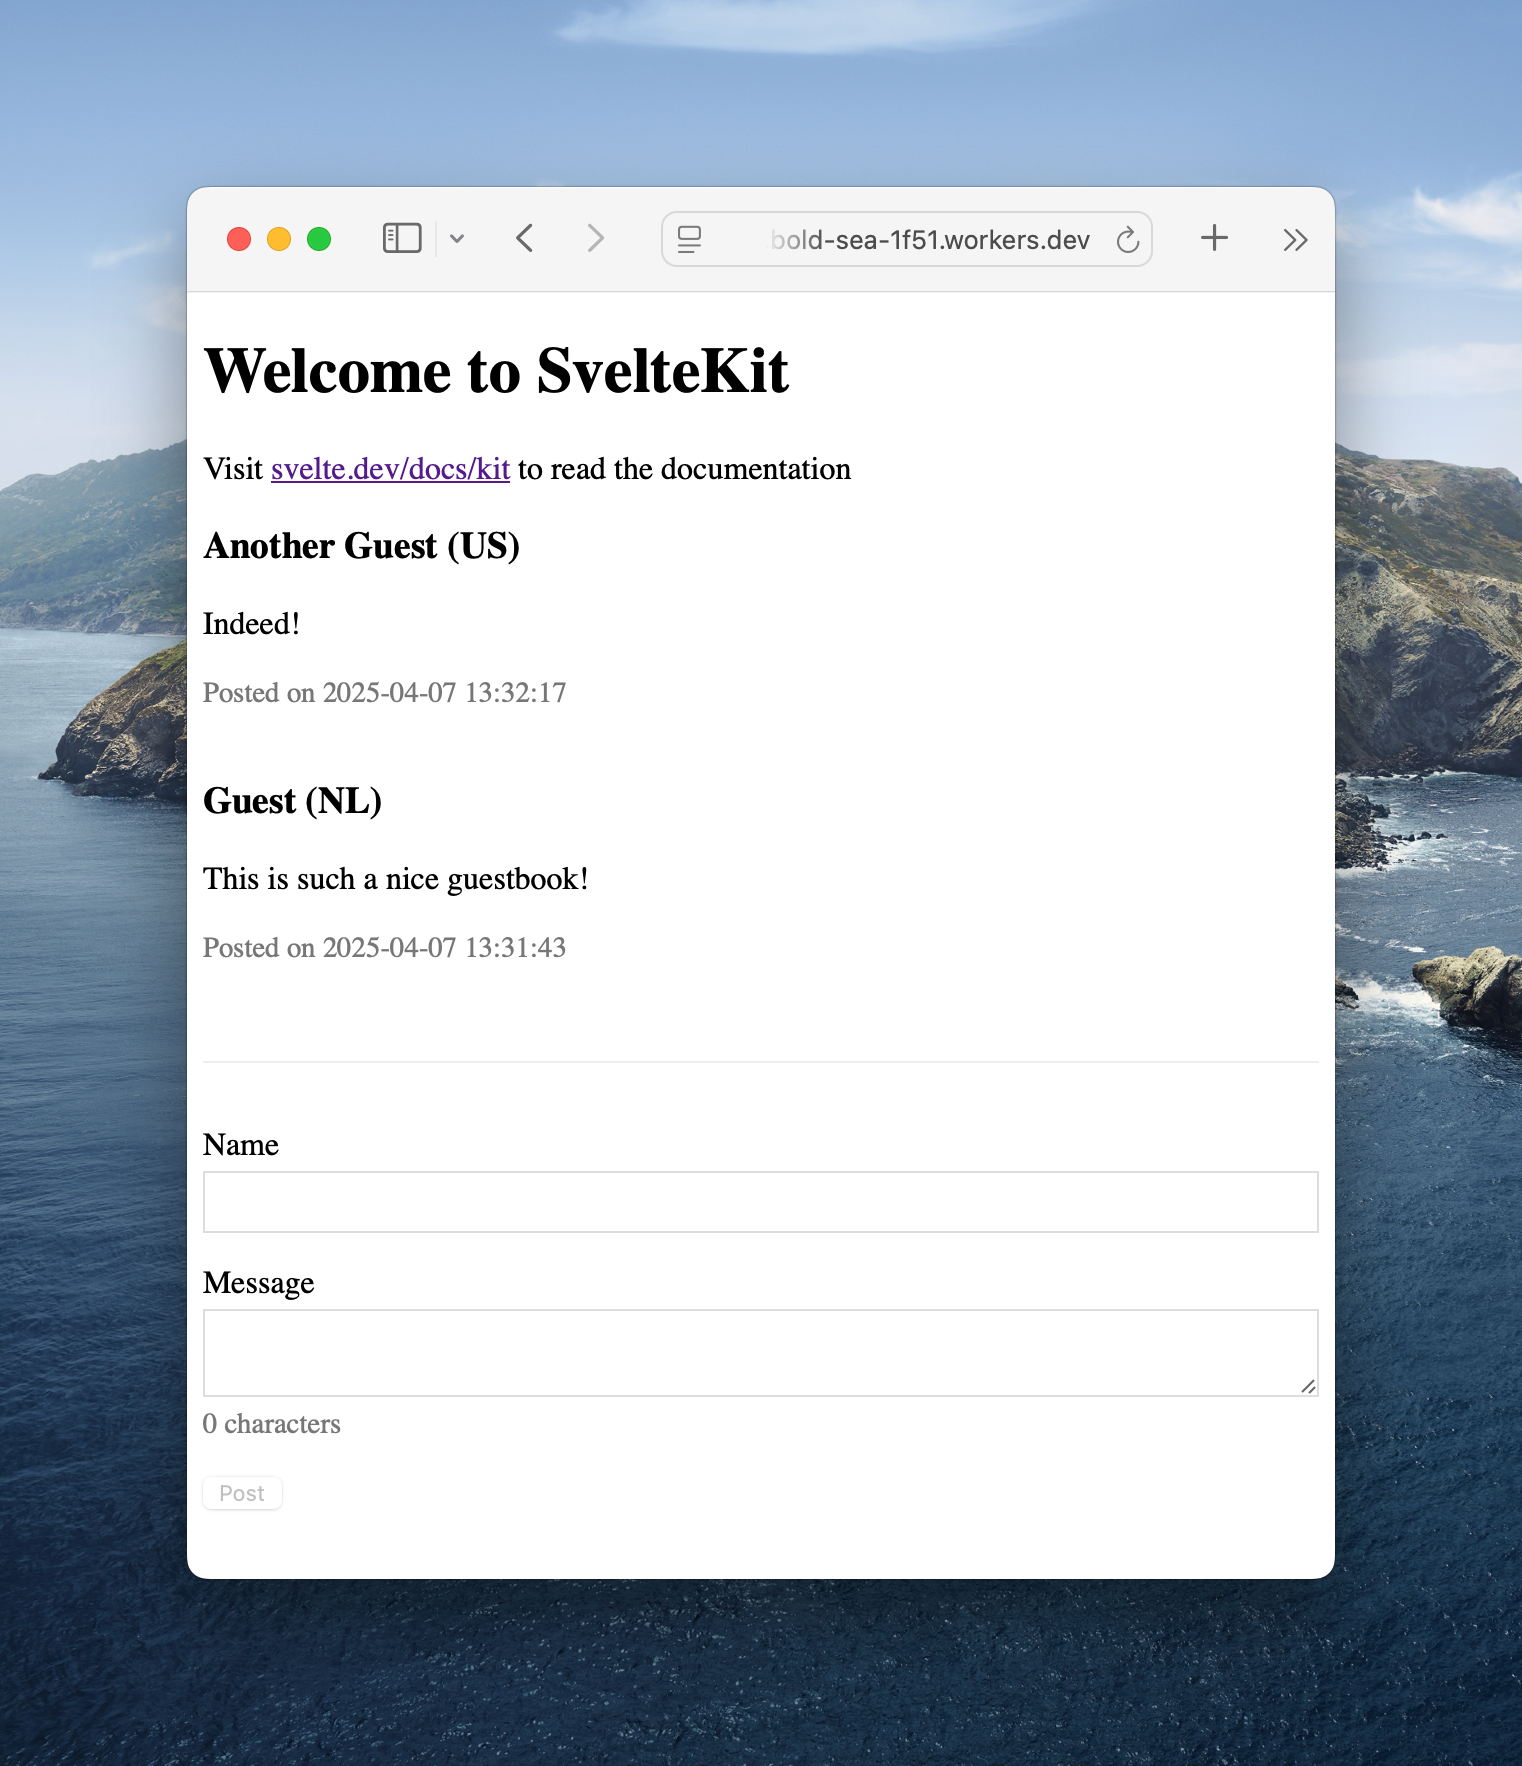
Figure 7. Fast, global applications!
Conclusion
This was quite the journey! We started with nothing and ended up with a working SvelteKit application deployed all around the globe. This cost us a total of $0 (or €0).
Hopefully you’re exited about this stack as I am. We live in a unique time where you can deploy applications for free. Now you know how!
In a future article I will build upon this guest book and add authentication using BetterAuth.
If you want to run this yourself, feel free to clone the repository:
Want to leave feedback? Let me know on X @Jilles or create an issue on the GitHub repository.