Setting Up Django for Success
In this article, we are setting up a Django project from scratch. This will be a different approach than blindly using any “starter template” or even the famous “djang-cookiecutter”. We add functionality step by step. At the end you will have a fully working Django application with a custom user model, authentication, a modern front-end framework (Vue, but you can follow the same steps for React or Svelte) and a REST API.
We start by setting up a Python environment using uv. Using the latest Python (3.13) and Django (5.1) at time of writing.
After setting up the project environment, we add a custom user model and implement email based authentication using django-allauth.
When our authentication flow is working, we add Vue with TypeScript using Vite, not losing any of benefits of Django templates. This will not be a Single Page Application (SPA). There is an option to add Tailwind, but you should consider that optional.
We add a Django Rest Framework (DRF) API and make an authenticated call from our Vue component. While not a comprehensive DRF part, it is enough to get you up and running.
Finally we clean up our environment. First we add code linting and formatting using ruff. Then we separate our development settings from our production settings.
Whether you’re a Django beginner or already have several successful projects running in production, I am confident you will find something useful here.
Let’s have fun!
Setting up uv and Python 3.13
We begin by installing uv. If you are not on Mac or Linux you can follow the installation guide on GitHub.
$ curl -LsSf https://astral.sh/uv/install.sh | sh1. Install uv
That’s it. That’s all we need to install uv! You might need to open a different shell for the installation to take effect. Next we’ll install Python 3.13
$ uv python install 3.132. Add Python 3.13 to uv
That was almost too easy. Now we just need to create a new Python project and we’re off to the races.
$ uv init my-django-project -p 3.13 --no-packageInitialized project `my-django-project` at `~/my-django-project`$ cd my-django-project3. Creating the Python project and environment
We set the –-no-package flag because we don’t intend to publish our Django application as a Python package.
Setting up Django 5.1 with a Custom User Model
Now that we have our Python project, we can add our dependencies. We’ll start with the default Django project and a custom user model.
The following custom user steps are inspired by Will Vincent’s LearnDjango “Django Custom User Model” post. The difference is that we will be using django-allauth for authentication and forget all about the username field.
$ uv add Django django-allauth4. Adding Django and allauth
Next we’ll initialize the Django project by using the django-admin, and start an “accounts” application for all things authentication and our custom user model.
$ uv run django-admin startproject my_django_project .$ uv run python manage.py startapp accounts5. Starting the Django project and creating the account app
Our application folder should now look as follows:
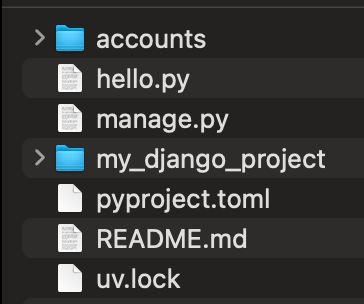
Figure 1. Application folder after installing Django and accounts app
We could now run our server, but will get an unapplied migrations warning:
$ uv run python manage.py runserver...You have 18 unapplied migration(s). Your project may not work properly until you apply the migrations for app(s): admin, auth, contenttypes, sessions.Run 'python manage.py migrate' to apply them.6. manage.py runserver warnings
Before we want to run these migrations, we want to create our custom user model and enable the django-allauth. Our first migration will then take care of all the necessary models required for the authentication flow.
First up the custom user model!
from django.contrib.auth.models import AbstractUser
class CustomUser(AbstractUser):    pass
    def __str__(self):        return self.email
7. accounts/models.py
I recommend CustomUser over just plain User. If you choose just User you might run into issues by mistakingly importing django.contrib.auth.models.User.
from django.contrib.auth.forms import UserCreationForm, UserChangeForm
from .models import CustomUser
class CustomUserCreationForm(UserCreationForm):
    class Meta:        model = CustomUser        fields = ("first_name", "last_name", "email")
class CustomUserChangeForm(UserChangeForm):
    class Meta:        model = CustomUser        fields = ("first_name", "last_name", "email")
8. accounts/forms.py (new file)
The forms will be used in the Django admin:
from django.contrib import adminfrom django.contrib.auth.admin import UserAdmin
from .forms import CustomUserChangeForm, CustomUserCreationFormfrom .models import CustomUser
class CustomUserAdmin(UserAdmin):    add_form = CustomUserCreationForm    form = CustomUserChangeForm    model = CustomUser    list_display = (        "first_name",        "last_name",        "email",    )
    add_fieldsets = (        (            None,            {                "classes": ("wide",),                "fields": ("username", "email", "first_name", "last_name", "password1", "password2"),            },        ),    )
admin.site.register(CustomUser, CustomUserAdmin)
9. accounts/admin.py
The add_fieldsets is needed currently because of an open issue. Finally we’ll update the settings to include djang-allauth. our new custom user model and the account application:
INSTALLED_APPS = [    'django.contrib.admin',    ...    'allauth',    'allauth.account',    ...    'accounts.apps.AccountsConfig',]
MIDDLEWARE = [    ...    'allauth.account.middleware.AccountMiddleware',]
AUTHENTICATION_BACKENDS = [    # Needed to login by username in Django admin, regardless of `allauth`    'django.contrib.auth.backends.ModelBackend',    # `allauth` specific authentication methods, such as login by email    'allauth.account.auth_backends.AuthenticationBackend',]
TEMPLATES = [    {        'BACKEND': 'django.template.backends.django.DjangoTemplates',        'DIRS': [BASE_DIR / "templates"],        ...     }]
...
# AuthenticationLOGIN_REDIRECT_URL = 'home'LOGOUT_REDIRECT_URL = 'home'AUTH_USER_MODEL = 'accounts.CustomUser'
ACCOUNT_AUTHENTICATION_METHOD = 'email'ACCOUNT_EMAIL_REQUIRED = TrueACCOUNT_USERNAME_REQUIRED = FalseACCOUNT_SESSION_REMEMBER = True
# EmailEMAIL_BACKEND = "django.core.mail.backends.console.EmailBackend"
10. django_vite_vue/settings.py
That’s quite a few changes. We’ve installed allauth and allauth.accounts. The accounts application enables regular account creation with just an email address. django-allauth also includes password reset flows and email confirmation functionality.
We enabled our own accounts application which contains our custom user model. Then we point AUTH_USER_MODEL to that new model.
An additional template folder “templates” was added. This is something suggested in the amazing Two Scoops of Django book. We’ll use this for our templates that do not belong to any application (e.g. base templates, 4xx and 5xx error pages).
Finally we set up allauth authentication through email instead of username. It will send a confirmation email to verify your account. Initially we will use a console.EmailBackend to print the would-be email to the console.
Now we can run create our migration files and apply them!
$ uv run manage.py makemigrationsMigrations for 'accounts':  accounts/migrations/0001_initial.py    + Create model CustomUser
$ uv run manage.py migrateOperations to perform:  Apply all migrations: account, accounts, admin, auth, contenttypes, sessionsRunning migrations:  Applying contenttypes.0001_initial... OK  ...  Applying sessions.0001_initial... OK
11. Apply migrations
Let’s create a superuser. Our superuser will need a username. allauth will secretly create usernames for us under the hood to enable log-in by email. The django admin still requires a username.
$ uv run python manage.py createsuperuserUsername: definitelynotadmin...Superuser created successfully.12. Create super user
We can now run our server (again) but this time successfully. Let’s run it and log-in to our django admin at 127.0.0.1:8000/admin/.
$ uv run python manage.py runserver13. Runserver, again
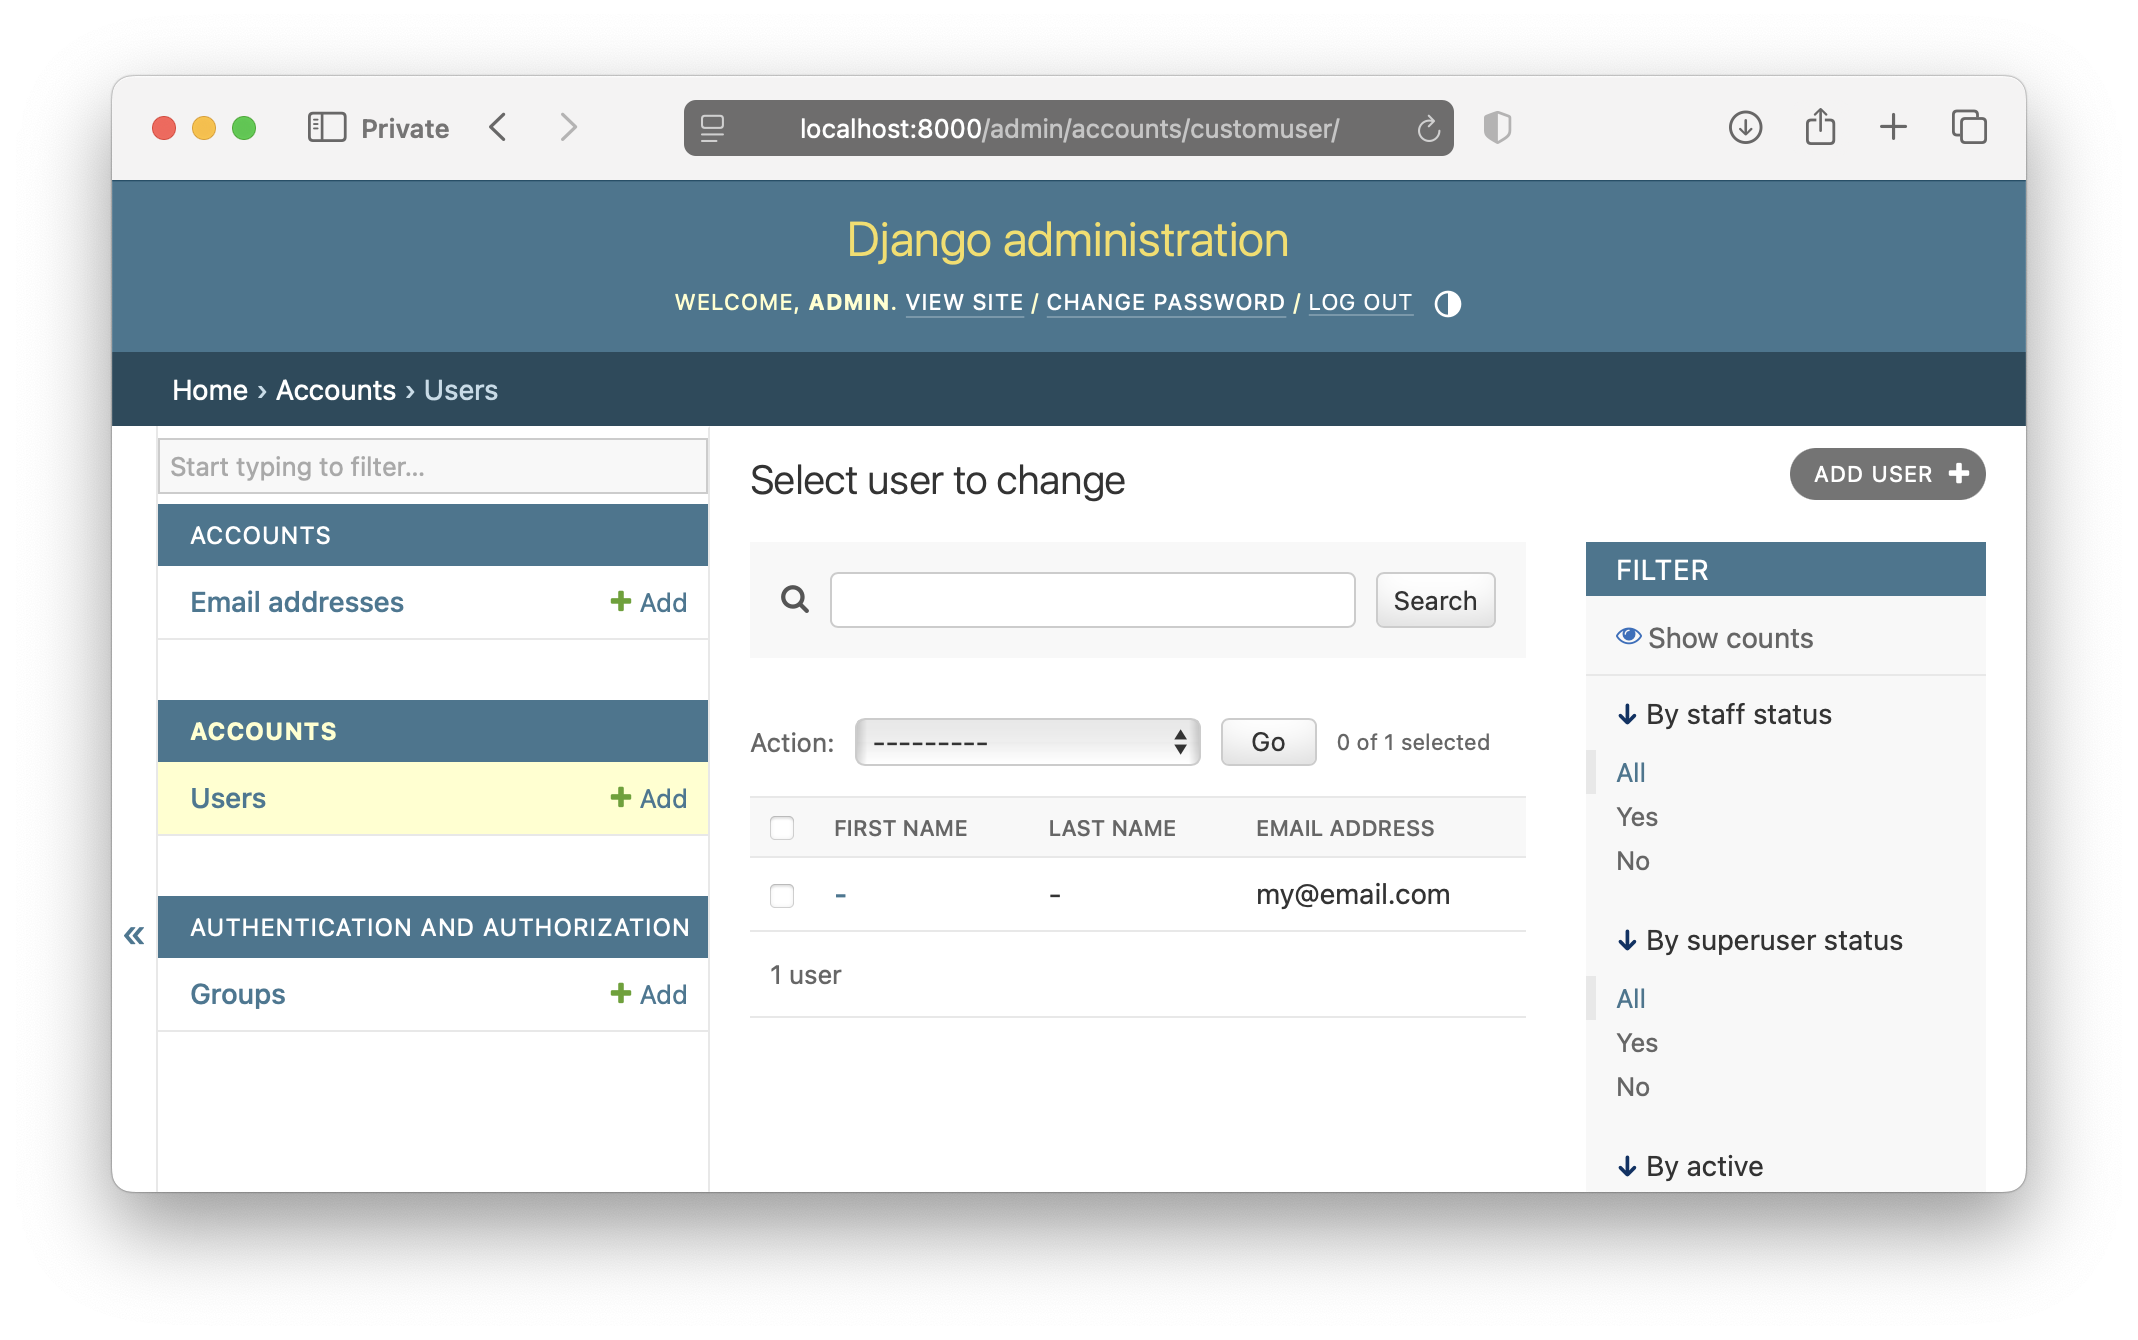
Figure 2. Django admin with custom user
You can see our custom user form as configured earlier! Now it’s time for the next section. Setting up authentication with all-auth.
Setting Up Authentication with django-allauth
In our previous section we already set ourselves up for success by adding the necessary django-allauth configuration (all settings that start with ACCOUNT_).
We begin with a simple homepage that contain a log-in and log-out button. Make sure your TEMPLATES['OPTIONS']['context_processors'] setting contains the django.contrib.auth.context_processors.auth context processor. If you didn’t remove it yourself it should be there. This adds the user object to template’s context so we can access user.is_authenticated.
<!doctype html><html lang="en"><head> <meta charset="UTF-8"> <meta name="viewport" content="width=device-width, initial-scale=1"> <title>Setting Up Django for Success</title></head><body>{% if user.is_authenticated %} <p>Logged in as {{ user.email }}</p> <form action="{% url 'account_logout' %}" method="post"> {% csrf_token %} <button type="submit">Logout</button> </form>{% else %} <p>Click <a href="{% url 'account_login' %}">here</a> to log-in</p>{% endif %}</body></html>14. templates/homepage.html
Note that the urls account_login and account_logout are urls provided by django-allauth. We just need to include them:
from django.contrib import adminfrom django.urls import path, include
from django.views.generic.base import TemplateView
urlpatterns = [    path('admin/', admin.site.urls),    path('accounts/', include('allauth.urls')),    path('', TemplateView.as_view(template_name='homepage.html'), name='home')]
15. my_django_project/urls.py
This is all we need to have a fully working authentication flow. Really!
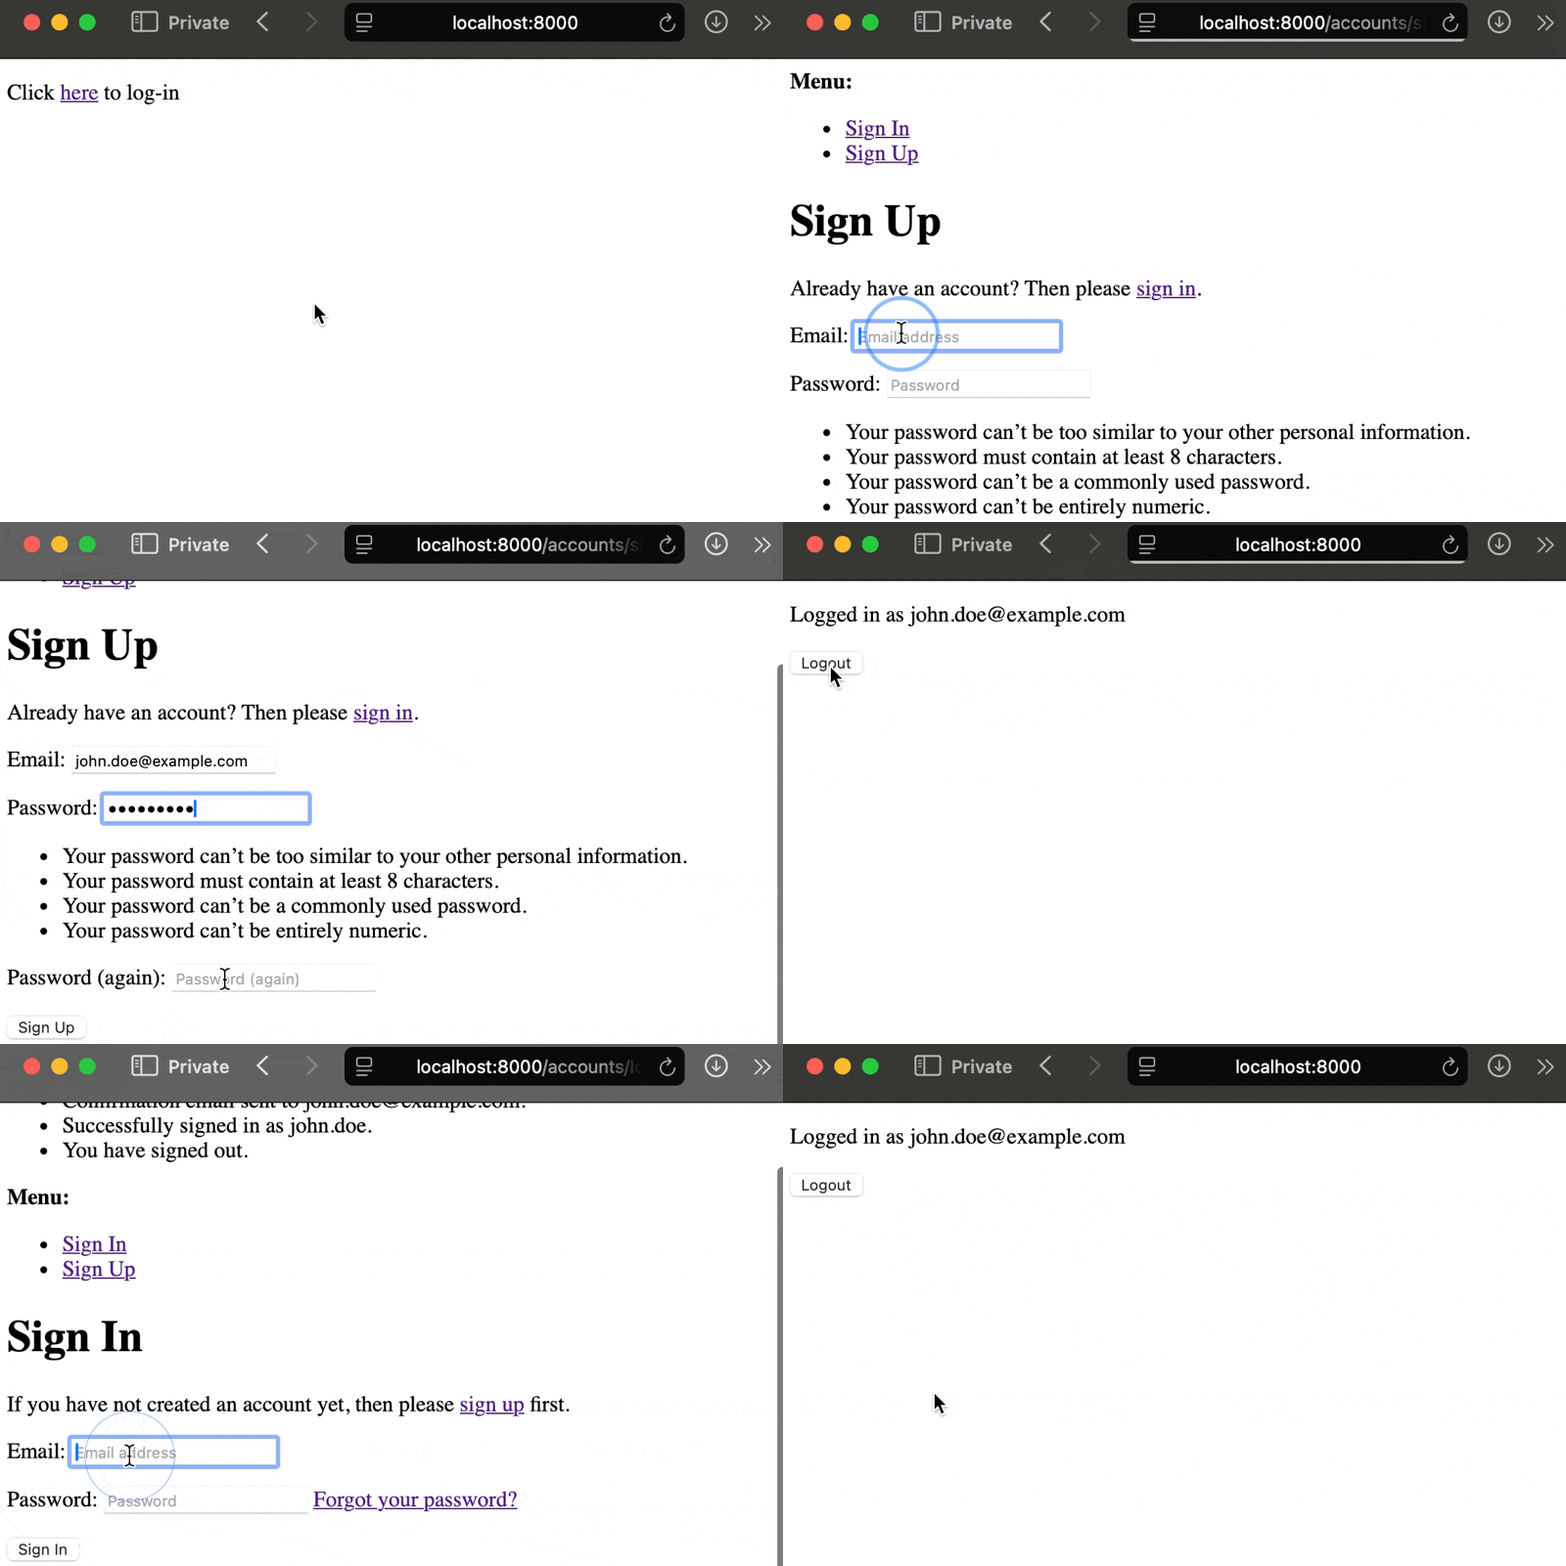
Figure 3. Fully working authentication flow
The verification email was sent to the console (remember that EMAIL_BACKEND in settings.py earlier?)
From: webmaster@localhostTo: john.doe@example.comDate: Sat, 18 Jan 2025 00:28:16 -0000Message-ID: <173716009685.29067.13173304503724876506@mac.attlocal.net>
Hello from localhost:8000!
You're receiving this email because user john.doe has given your email address to register an account on localhost:8000.
To confirm this is correct, go to http://localhost:8000/accounts/confirm-email/Mg:1tYwhE:44svfsQDTh8vOt_rr2_XxeszZJnUBBuubn2rCrgSS54/
Thank you for using localhost:8000!
16. Console confirmation email
Changing the above welcome email template is pretty straightforward if you read the allauth documentation.
Adding a Vite and Vue Web Application
We are using Vite with one of their supported templates. This mean you can choose to use the following templates, with both JavaScript and TypeScript:
- Vanilla (i.e. no framework)
- Vue
- React
- Svelte
- Any other listed supported template
Recently my framework of choice with Django has been Vue. There is a great talk by Mike Hoolehan at DjangoCon US about combing Django Templates and Vue Single File Components (SFC) that inspired me.
Vue templates are very similar to HTML. Since we want to heavily rely on Django templates for Server Side Rendering (SSR) and only use Vue for dynamic components, the similarity between HTML and Vue’s templates is a major benefit.
Since I want to set you up for success, we will be using pnpm. It’s like npm but it symlinks your npm packages if you’ve ever installed them. It’s really fast. I’ve ran pnpm install on a plane (without WiFi!). If you don’t have it, you can install it using:
$ curl -fsSL https://get.pnpm.io/install.sh | env PNPM_VERSION=10.0.0 sh -17. Install pnpm
Now it’s time to add our frontend. The larger Django community seems to like the frontend folder name. It makes sense when you have a Single Page Application (SPA) with a totally separate back-end. We rely heavily on Django templates and they will have “frontend” assets too. Therefore my folder name of choice is: webapp.
We’ll start by creating a Vue application with TypeScript support in our project:
$ pnpm create vite webapp --template vue-ts18. Create a Vite/Vue project
Now we can install the dependencies and start the default Vue project:
$ cd webapp$ pnpm add @types/node@20 -D # or any Node version you use$ pnpm install$ pnpm dev...  VITE v6.0.7  ready in 592 ms
  ➜  Local:   http://localhost:5173/  ➜  Network: use --host to expose  ➜  press h + enter to show help
19. Run the Vite/Vue application
If you open the development link in your browser you’ll see the standard Vite + Vue application.
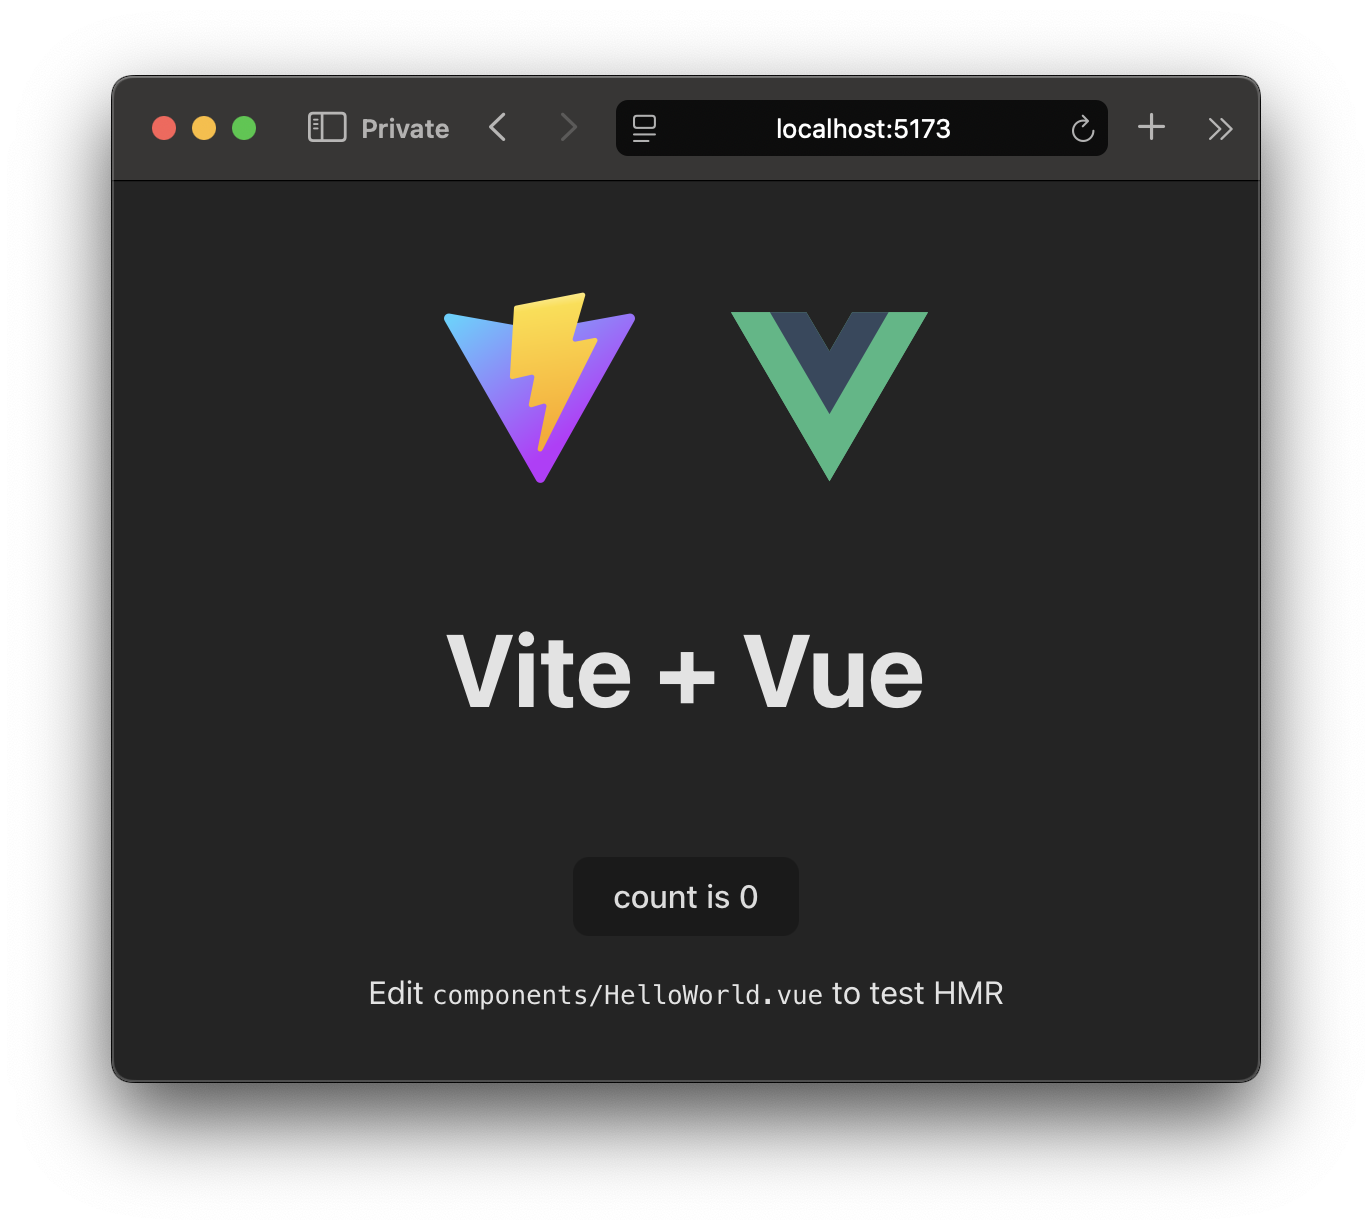
Figure 4. Vite/Vue Application
The “Vite + Vue” title and counter you see above is part of the default Vue template’s HelloWorld.vue component. We’ll render this component into our Django application home template.
Let’s update main.ts to only render the HelloWorld.vue with a different message:
import { createApp } from 'vue'import HelloWorld from "./components/HelloWorld.vue";
createApp(HelloWorld, {    msg: 'Django 🤝🏻 Vue'}).mount('#app')
20. webapp/src/main.ts
What we want to achieve is to render this Vue component into our Django application. This is pretty easy thanks to django-vite. We can update our vite.config.ts file include the configuration django-vite needs:
- A “base” folder that matches our static url
- A manifest.json for django-vite to resolve the generated build artifacts
- An output folder for the build artifacts
- Input files to bundle. – Normally Vite uses index.html to find the build artifacts, but we will be using Django templates.
import { resolve } from 'path'import { defineConfig } from 'vite'import vue from '@vitejs/plugin-vue'
// https://vite.dev/config/export default defineConfig({  plugins: [vue()],  // Matches Django's STATIC_URL setting  base: "/static/",  build: {    // Used by django_vite to map artifacts to Django's static files    manifest: "manifest.json",    // Matches Django's STATIC_ROOT setting, used by collectstatic for production    outDir: resolve("./dist"),    // Our entry points    rollupOptions: {      input: {        main: resolve('./src/main.ts'),      }    }  }})
21. webapp/vite.config.ts
Now that our web app is set-up, it’s time to hook it up to Django. We’re going to make the following changes:
- Install django-vite
- Update settings.py to configure django-vite
- Update our homepage template to include the
mainbundle and render it to<div id="app"></div>
$ uv add django_vite22. Installing django_vite
INSTALLED_APPS = [     ...    'allauth',    'allauth.account',    'django_vite', # new    'accounts.apps.AccountsConfig',]...
# Static files (CSS, JavaScript, Images)# https://docs.djangoproject.com/en/5.1/howto/static-files/
STATIC_URL = 'static/'STATIC_ROOT = BASE_DIR / 'static'STATICFILES_DIRS = [    BASE_DIR / "webapp/dist"]
DJANGO_VITE = {    "default": {        "dev_mode": DEBUG    }}
23. settings.py
STATICFILES_DIRS is where Django will look for static files when doing collectstatic . STATIC_ROOT is where it will put those files. This is used by your production builds and not during development.
We set dev_mode to DEBUG. Which means that when you’re developing locally it will use Vite’s development URLs (e.g. localhost:5173/static/main-abc123.ts) with hot module reloading, and on production it will use production URLs (/static/main-abc123.js). Later in this article we’ll separate them into environment specific files.
Now we just need to include the right tags into our homepage template:
{% load django_vite %}<!doctype html><html lang="en"><head>    <meta charset="UTF-8">    <meta name="viewport" content="width=device-width, initial-scale=1">    <title>Modern Django</title>    {% vite_hmr_client %}    {% vite_asset "src/main.ts" defer="" %}</head><body>{% if user.is_authenticated %}    <p>Logged in as {{ user.email }}</p>    <form action="{% url 'account_logout' %}" method="post">        {% csrf_token %}        <button type="submit">Logout</button>    </form>{% else %}    <p>Click <a href="{% url 'account_login' %}">here</a> to log-in</p>{% endif %}
<div id="app"></div>
</body></html>
24. templates/homepage.html
There are 4 additions:
{% load django_vite %}loads the required django-vite tags.{% vite_hmr_client %}includes the Hot Module Reload client. This allows you to change TypeScript code without refreshing your browser.{% vite_asset 'src/main.ts' defer='' %}includes ourmain.tsfile. Don’t worry about the.tsextension. When we dopnpm run build, Vite will turn it into JavaScript and django-vite will use the manifest.json file include the generated JavaScript file. Thedeferattribute makes the browser download the script when it parsed the script tag, but defer execution of JavaScript after the rest of the HTML is loaded.<div id="app"></div>is the mount target of our Vue component. This matches ourmain.tscall.mount('#app').
Make sure your dev server is still running (see step 19). You should now have a Vue component running inside your Django application!
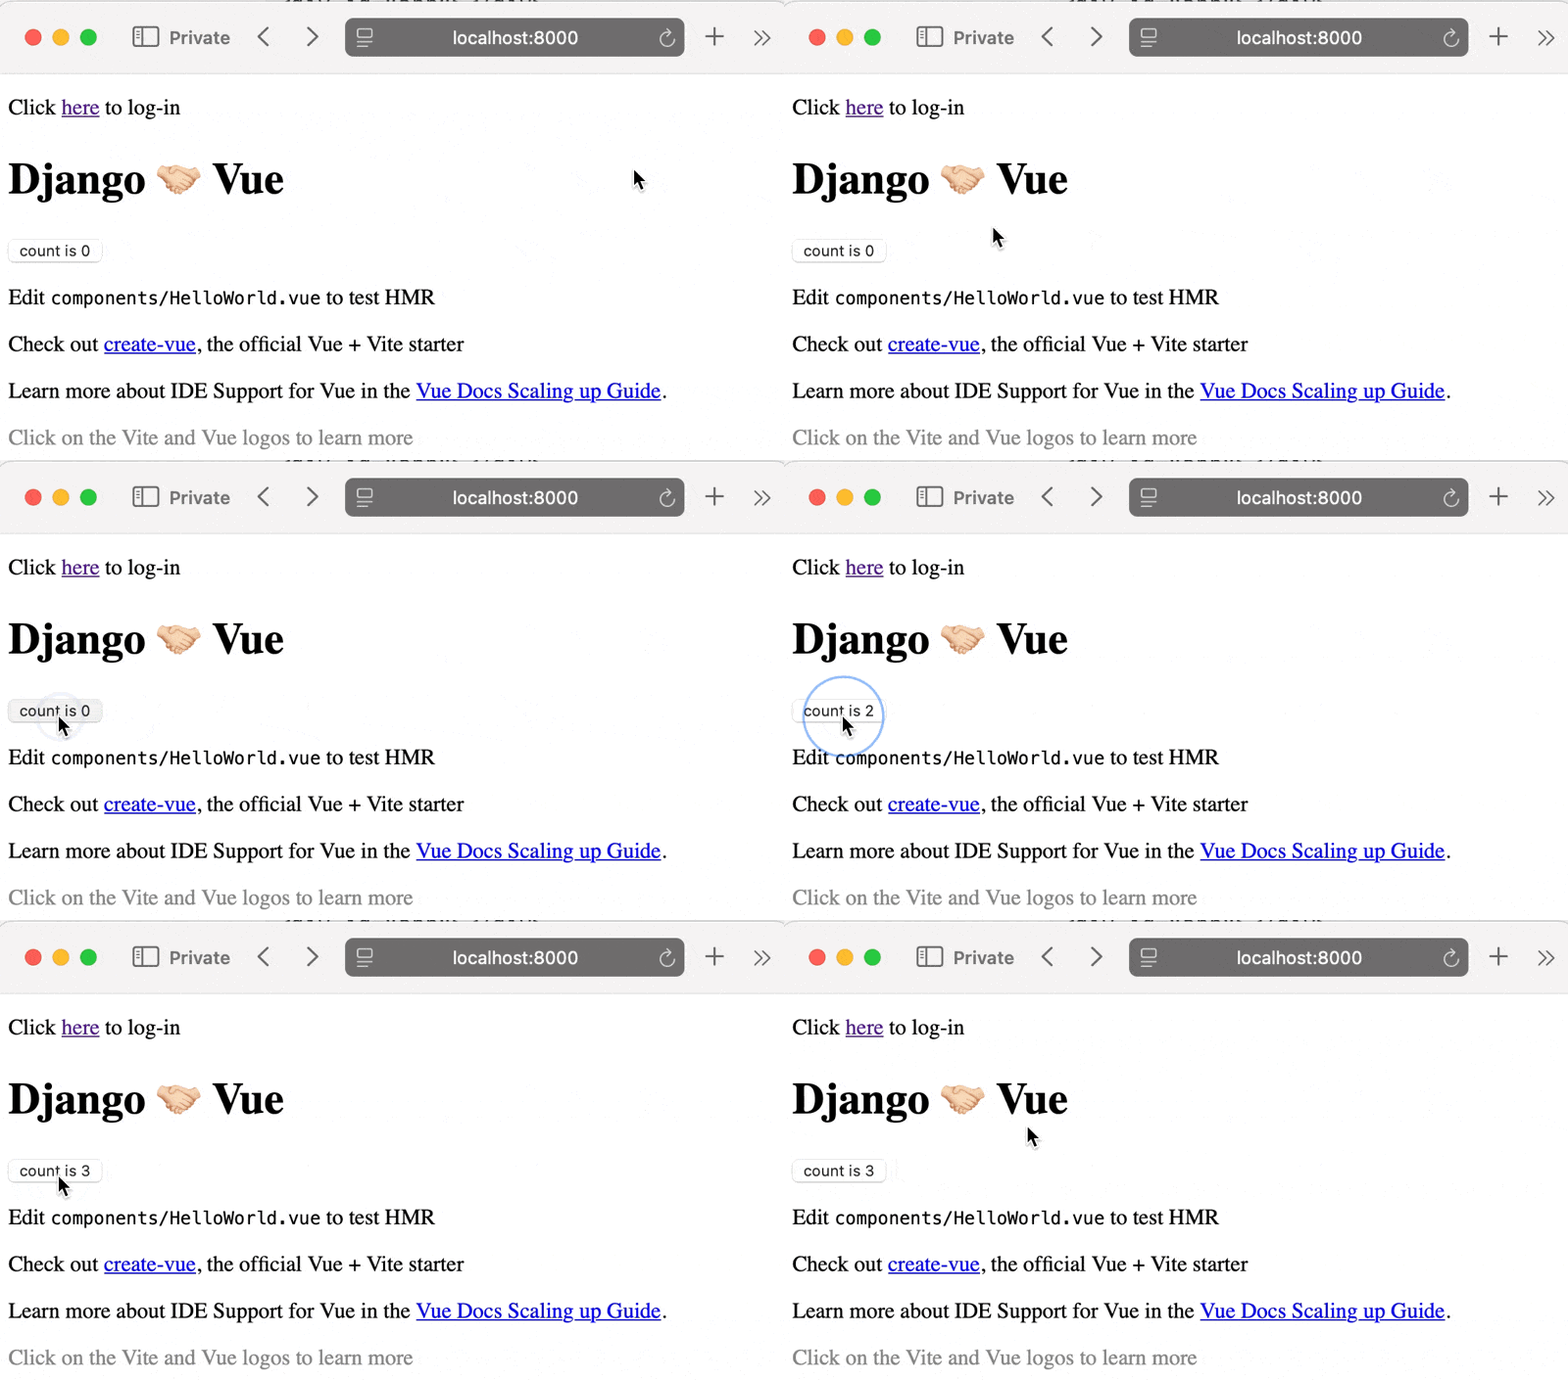
Figure 5. Vue running inside Django template
Lovely! These steps are pretty similar if you want to use React. You use the react-ts Vite template and use createRoot instead of Vue’s createApp().mount().
Server Side Rendering (SSR) and Hydration
Our Vue component is successfully mounted, but the server template is just <div id="app"></div>. This is not a problem if the content of your Vue components should not be indexed by search engines (e.g. a confirm modal). However, if you want your Vue components’ content indexed (e.g. your products that are rendered by Vue), then you likely want SSR.
This is where people usually opt-in for Nuxt for Vue or Next.js for React. They make SSR very easy. You just almost all benefits of Django.
I am going to suggest a different approach but beware: this is not a golden bullet. It requires some duplication between Django Templates and Vue components. There is also diligence required. If your Django Template is totally different from your Vue component, you incur layout shift. This will hurt your Cumulative Layout Shift (CLS) metric.
We are going to render the component using Django templates and “hydrate” it using Vue. Our counter is a decent example. The SSR state should have a disabled button and the counter. When we render our Vue component, it will become the clickable button.
Some thought has to be given to what should be hydrated. In our example the text is static (“Django 🤝🏻 Vue”), we don’t need to render that in Vue. It can be a plain old Django template. The button that increases count though, should be hydrated.
So let’s update our Django template’s app container to render everything that’s currently in our Vue HelloWorld component.
<div>    <h1>Django 🤝🏻 Vue</h1>
    <div class="card">        <span id="homepage-count-button">            <button type="button" disabled>count is 0</button>        </span>        <p>            Edit            <code>components/HelloWorld.vue</code> to test HMR        </p>    </div>
25. templates/homepage.html
This will render our heading and button in a disabled state. This is SSR. There is just no client hydration yet. Note that we removed the #app id and instead wrapped our button in a span #homepage-count-button.
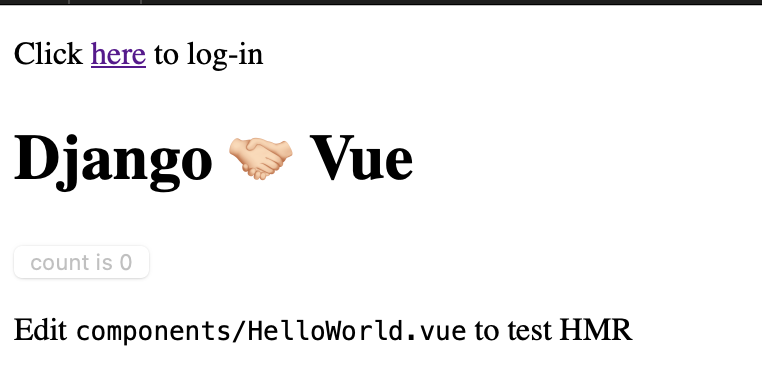
Figure 6. SSR
Now we hydrate only the button!
<script setup lang="ts">import { ref } from 'vue'const count = ref(0)</script>
<template>    <button type="button" @click="count++">count is {{ count }}</button></template>
26. webapp/src/components/HelloWorld.vue
import { createApp } from 'vue'import HelloWorld from "./components/HelloWorld.vue";
createApp(HelloWorld).mount('#homepage-count-button')
27. webapp/src/main.ts
As you will see, the page is rendered immediately (SSR) with a disabled button. When the browser has parsed the script (main.ts) it will mount the Vue component.
To demonstrate these changes I set my network connection to slow.
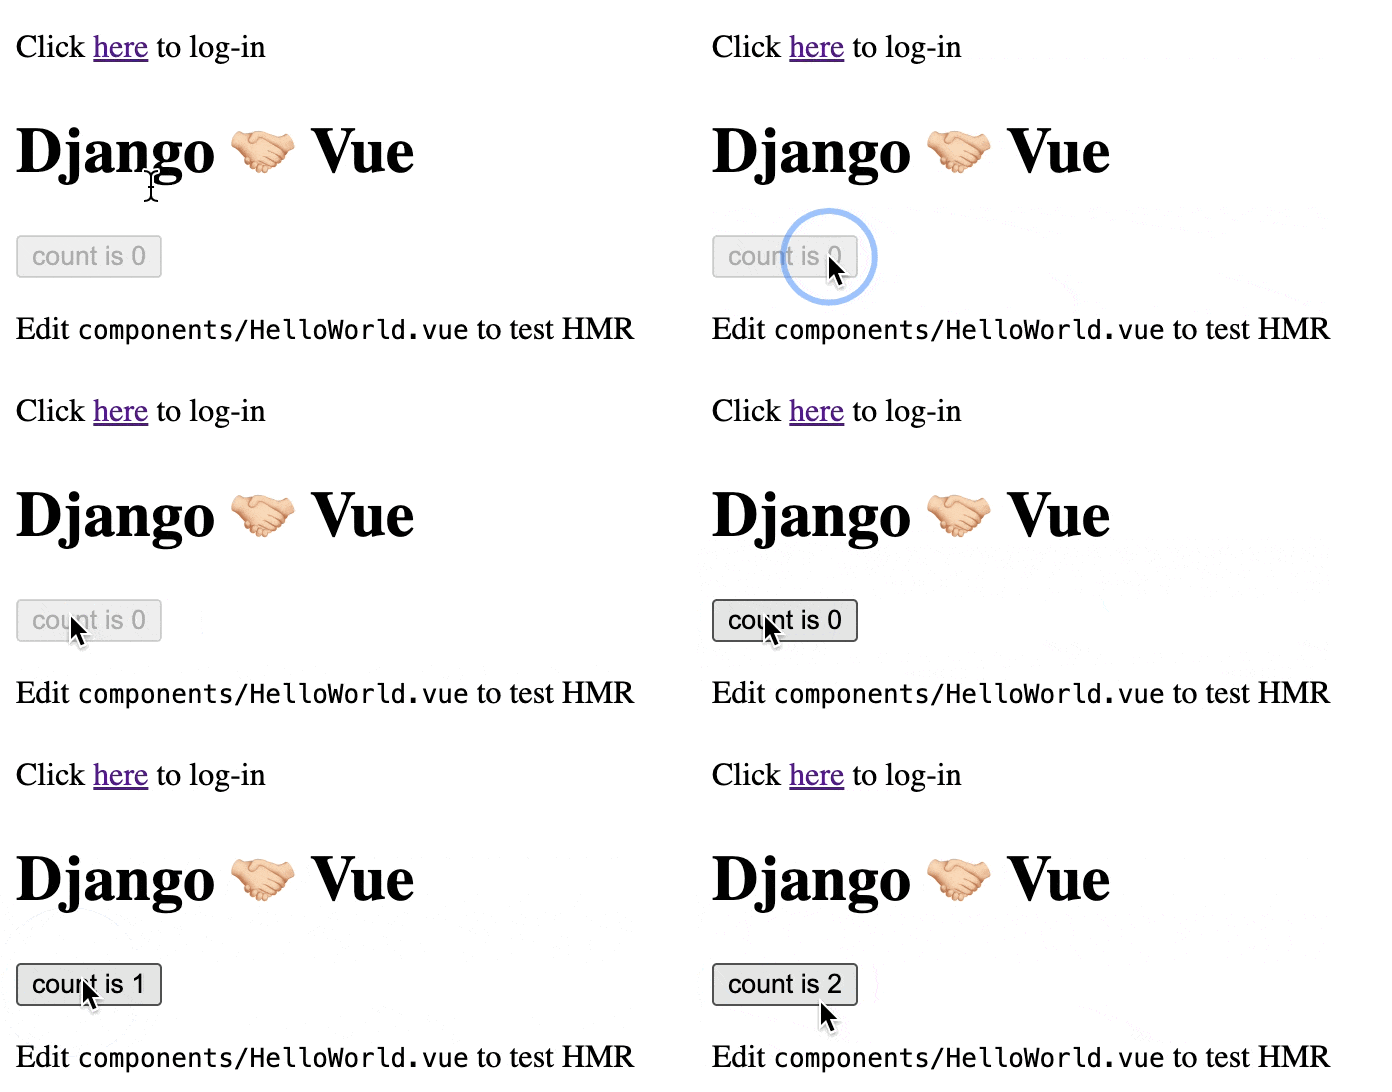
Figure 7. SSR + Hydration
Component props without REST
We’ve got all our data in our database managed by Django. How do we pass data down to our Vue components without showing a loading spinner and making a GET request?
In spirit of this being a simple application, we will add count to our custom user model. Then we can pass it down in the Django template.
from django.db import modelsfrom django.contrib.auth.models import AbstractUser
class CustomUser(AbstractUser):    count = models.PositiveIntegerField(default=0)
    def __str__(self):        return self.email
28. accounts/models.py
Update our database by creating and applying migrations. Then let’s also set our count to a higher number.
$ uv run manage.py makemigrationsMigrations for 'accounts': accounts/migrations/0002_customuser_count.py + Add field count to customuser$ uv run manage.py migrateOperations to perform: Apply all migrations: account, accounts, admin, auth, contenttypes, sessionsRunning migrations: Applying accounts.0002_customuser_count... OK$ uv run manage.py shell>>> from accounts.models import CustomUser>>> CustomUser.objects.filter(email="john.doe@example.com").update(count=100)129. Applying migrations and setting default value
We will need to update our simple inline TemplateView to an view with a bit more logic. Therefore we extract the simple view from earlier into its own class.
from django.views.generic import TemplateView
class HomePageView(TemplateView):    template_name = 'homepage.html'
    def get_context_data(self, **kwargs):        context = super().get_context_data(**kwargs)        user = self.request.user
        context["homepage_count_button_props"] = {            "isAuthenticated": user.is_authenticated,            "count": user.count if user.is_authenticated else None,        }
        return context
30. accounts/views.py
The button properties will be passed to our Vue component. We have isAuthenticated to keep the button disabled for anonymous users. Note the switch from snake_case to camelCase. Most web projects use camelCase by convention.
Django has a lovely json_script template tag that escapes all HTML. It serializes JSON and puts it in a <script type="application/json"> tag. We can get the textContent of that tag and parse it as valid and safe JSON.
<h1>Django 🤝🏻 Vue</h1>
    <div class="card">        {{ homepage_count_button_props | json_script:"homepage-count-button-props" }}        <span id="homepage-count-button">            <button type="button" disabled>count is {{ homepage_count_button_props.count | default_if_none:0 }}</button>        </span>
31. templates/homepage.html
Our main.ts component needs to parse the JSON and pass it as rootProps to the HelloWorld.vue component. This component stays disabled when isAuthenticated is false.
function getComponentProps(selector: string) {    const element = document.querySelector(selector);    if (!element?.textContent) return {};    try {        return JSON.parse(element.textContent)    } catch (e) {        return {}    }}
createApp(HelloWorld, getComponentProps('#homepage-count-button-props'))    .mount('#homepage-count-button')
32. webapp/src/main.ts
This getComponentProps function is a helper function to make sure a valid JavaScript object is always passed. Even if the JSON script isn’t found or the JSON is malformed.
<script setup lang="ts">import { ref } from 'vue'
const props = defineProps<{ isAuthenticated: boolean, count?: number }>()const count = ref(props.count || 0)</script>
<template>    <button type="button" @click="count++" :disabled="!isAuthenticated">count is {{ count }}</button></template>
33. webapp/src/components/HelloWorld.vue
The addition of :disabled="!isAuthenticated" keeps the button disabled for unauthenticated users. Time to update the URLs to point to our new view.
from django.contrib import adminfrom django.urls import path, include
from accounts.views import HomePageView
urlpatterns = [    path('admin/', admin.site.urls),    path('accounts/', include('allauth.urls')),    path('', HomePageView.as_view(), name='home')]
34. my_django_project/urls.py
Now enjoy this magnificent fully authenticated SSR / hydration flow!
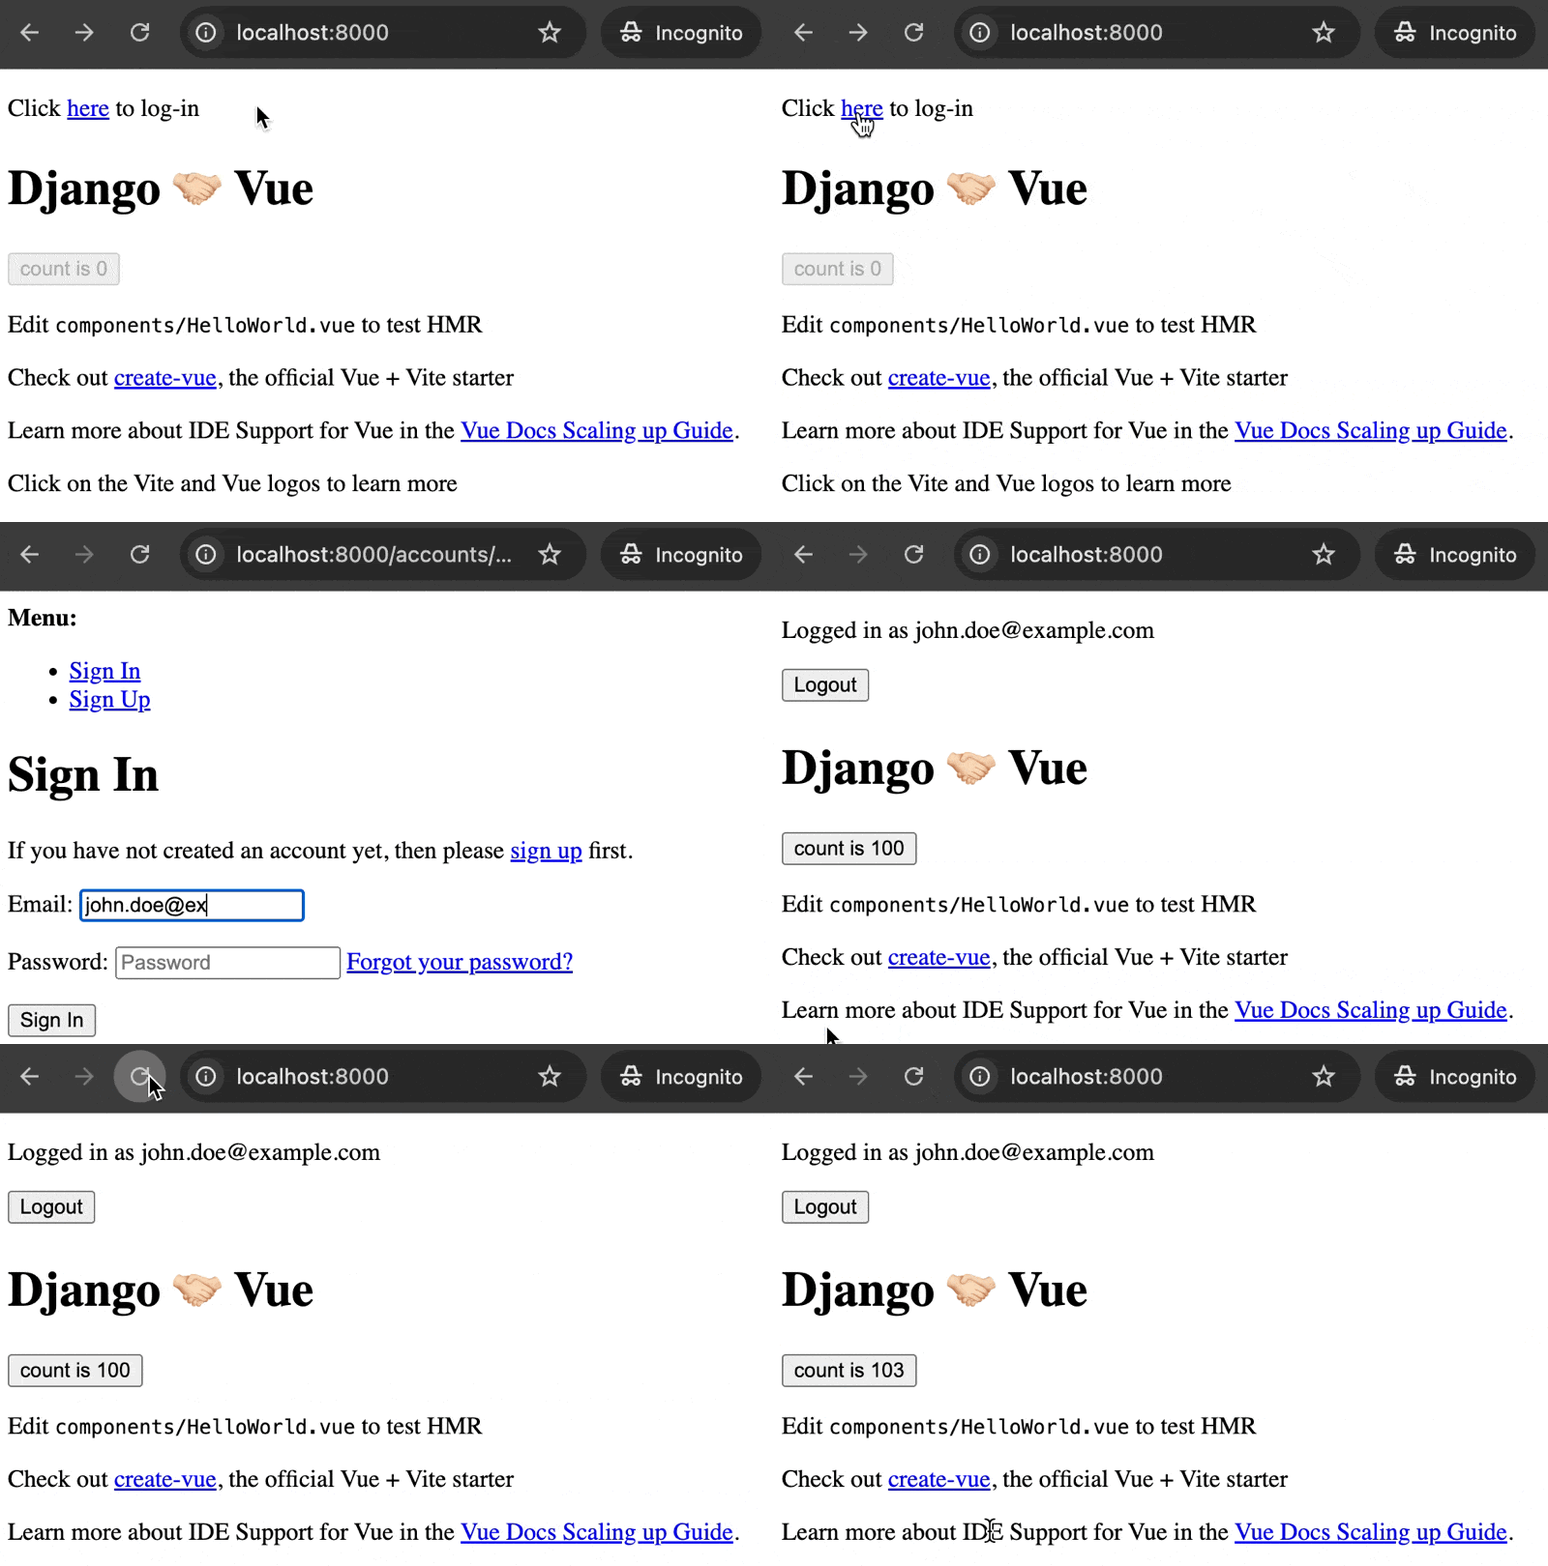
Figure 8. Full authenticated SSR/hydration flow
Adding Tailwind
I’ll admit it. I used to be a Tailwind hater. As someone who likes writing CSS I couldn’t see the appeal. Then I tried it and… loved it. Only one file to edit (html), and never think about class names again (content-box__title—uppercased no thank you)! It’s not for everyone so I’ll keep this as a separate article:
[
How to set up Tailwind in Django with Vite and django-vite
In this article we are going to set up Vite for a Django application and use it to install and use Tailwind. You will be able to use this for any other npm packages in the future, too! This guide assumes you already have a Django application up and running.
![]() Jilles SoetersJilles Soeters
Jilles SoetersJilles Soeters

](/how-to-set-up-tailwind-in-django-with-vite-and-django-vite/#adding-tailwind)
Django REST Framework
You can go really far with just Django templates and some Vue components sprinkled here and there. You can go even further when you add Django REST Framework (DRF). It’s the piece that bridges the gap between full SPA and just Django templates.
One major benefit of our current approach (server side rendered templates with client mounted Vue components) is that you don’t need any additional authentication methods such as a JWT.
If you want to add a standalone API for your mobile clients, you might still want token authentication, but for our current set-up, we already have everything we need.
$ uv add djangorestframework35. Adding DRF
For a real-world project you likely want to have the following:
- Serializers
- ViewSets
- Routers
But for the purpose of demonstration, we will have one APIView to update the count. One simple PATCH endpoint to update the count by 1. It will be in a new module under the accounts application (make sure to create a new __init__.py )
from django.contrib.auth import get_user_modelfrom django.db.models.expressions import Ffrom rest_framework import statusfrom rest_framework.response import Responsefrom rest_framework.views import APIViewfrom rest_framework.permissions import IsAuthenticated
class IncrementCountView(APIView):    permission_classes = [IsAuthenticated]
    def patch(self, request, *args, **kwargs):        get_user_model().objects.filter(pk=request.user.pk).update(count=F("count") + 1)        request.user.refresh_from_db()        return Response(data={'updatedCount': request.user.count}, status=status.HTTP_200_OK)
36. accounts/api/views.py
Our view handles the PATCH request. It requires the permission_classes = [IsAuthenticated]. This checks for the current user. Unauthenticated users will get a 403 error code. This is all we need on the Django side in order to protect this api endpoint. Let’s add it to our URLs:
from accounts.views import HomePageViewfrom accounts.api.views import IncrementCountView
urlpatterns = [    ...    path('accounts/', include('allauth.urls')),    path('api/me/count', IncrementCountView.as_view(), name='increment_count'),    path('', HomePageView.as_view(), name='home')]
37. my_django_project.urls.py
By default we have CSRF protection enabled. This is a great security measure, but you have to store the token somewhere. There are multiple options, such as storing it in a cookie or in your HTML. I like using a <meta> tag:
...<head> <meta charset="UTF-8"> <meta name="viewport" content="width=device-width, initial-scale=1"> <meta name="csrf-token" content="{{ csrf_token }}"> ...38. templates/homepage.html
We need to have this access token available in our Vue application. Again there are various options to achieve the same thing. You could store the token on the window object, or in Vue use app.config.globalProperties. I’m going to use another approach: provide and inject. Open up our main.ts:
function getComponentProps(selector: string) { ... }
function getCsrfToken() {    const csrfToken = document.querySelector('meta[name="csrf-token"]')?.getAttribute('content');    if (!csrfToken) {        throw new Error('CSRF token not found');    }    return csrfToken;}
createApp(HelloWorld, getComponentProps('#homepage-count-button-props'))    .provide('csrfToken', getCsrfToken()) // !    .mount('#homepage-count-button')
39. webapp/src/main.ts
We created another helper function to get the CSRF token. Then we pass it to our app using .provide().
A few minor changes have to be applied in order to make our counter persistent:
- Inject the provided CSRF token
- Change
@click="count++""to make aPATCHrequest - Assign API response to the counter
Our updated component looks as follows:
<script setup lang="ts">import { ref, inject } from 'vue'
const props = defineProps<{ isAuthenticated: boolean, count?: number }>()const csrfToken = inject<string>('csrfToken')const count = ref(props.count || 0)
async function increment() {  if (!csrfToken) return;
  try {    const response = await fetch('/api/me/count', {      credentials: 'same-origin',      mode: 'same-origin',      method: 'PATCH',      headers: {        'mode': 'same-origin',        'X-CSRFToken': csrfToken      },    })    if (response.ok) {      const data: { updatedCount: number } = await response.json()      count.value = data.updatedCount    }  } catch (error) {    console.error(error)  }}</script>
<template>    <button type="button" @click="increment" :disabled="!isAuthenticated">count is {{ count }}</button></template>
40. webapp/src/components/HelloWorld.vue
The credentials option is set to same-origin to include cookies only to requests on the same origin. The mode option makes sure we don’t even attempt to make the request if the target isn’t on the same origin.
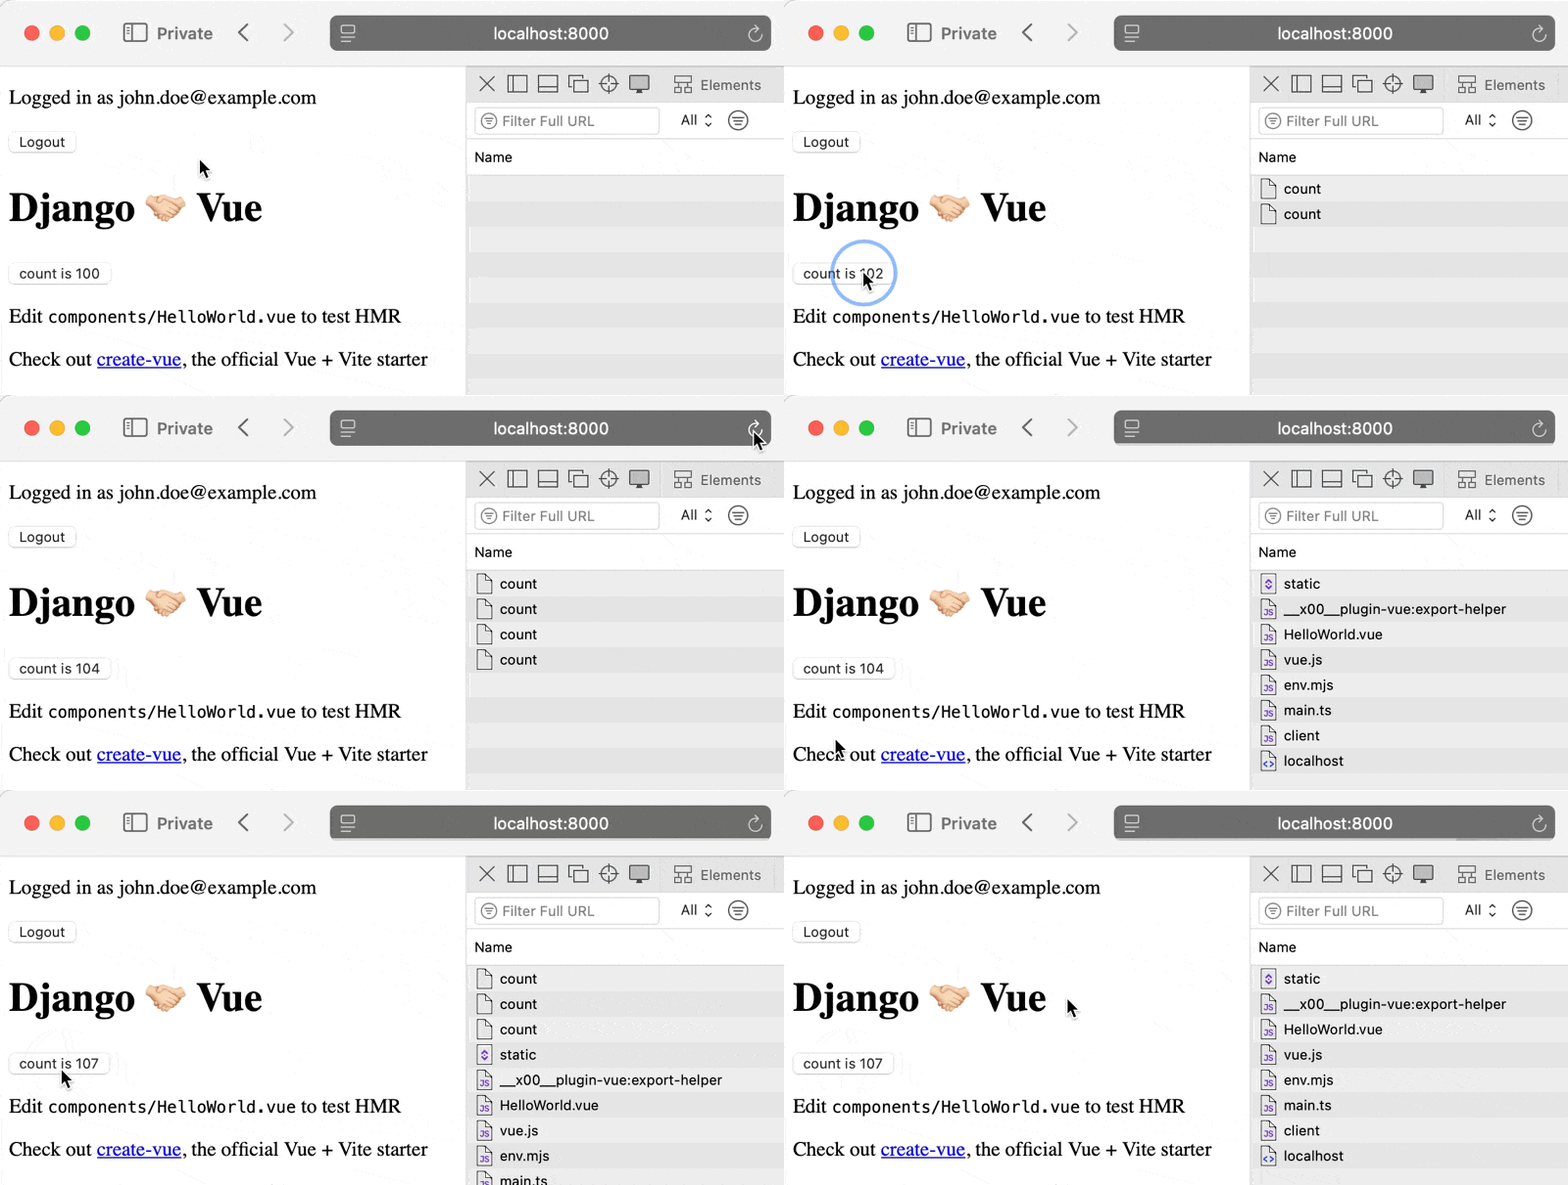
Figure 9. Authenticated JSON API
Done. We now have a fully functioning application that can persist data over a JSON API.
Adding ruff for Linting and Code Formatting
Our application is up and running. Now let’s do some housekeeping. ruff is the ultra fast code formatter written in Rust. It’s black, isort and other formatters/linters all in one. We begin by installing the dependency as a development dependency. This allows us to not download it on a production environment if we choose to do so.
$ uv add ruff --dev41. Adding ruff as a development dependency
This should add a [dependency-groups] group in your pyproject.toml. Underneath we’ll add some configuration. I am sticking mostly with the default configuration.
...[dependency-groups]dev = [    "ruff>=0.9.2",]
[tool.ruff]line-length = 100exclude = [    "migrations",    "node_modules",    "static",    "templates",    "venv",]
[tool.ruff.lint]select = ["E4", "E7", "E9", "F", "I"]ignore = []
[tool.ruff.format]quote-style = "double"
42. pyproject.toml
The “select” property could use some clarification. E is for pep8 (now pycodestyle). Rules are grouped by their number, see their error codes documentation. F is for pyflakes, and we want all their error codes. Finally I is for isort.
We’re saying: lint all imports (E4), statements (E7), runtime (E9), all pyflakes warning, and all isort (import order) warnings. See it in action:
$ uv run ruff check .accounts/admin.py:1:1: I001 [*] Import block is un-sorted or un-formatted |1 | / from django.contrib import admin2 | | from django.contrib.auth.admin import UserAdmin3 | |4 | | from .forms import CustomUserCreationForm, CustomUserChangeForm5 | | from .models import CustomUser...Found 7 errors.[*] 7 fixable with the `--fix` option.43. lint errors
We can let ruff fix it by running the same command and appending --fix. ruff will attempt to fix these issues for us.

Figure 10. ruff fixed import order
Next after linting our code, we want to format it. Formatting keeps the coding style consistent across teams. No more arguments between double quotes or single quotes. Tabs or spaces. The formatter will take care of it. Spaces are better, by the way.
$ uv run ruff format12 files reformatted, 4 files left unchanged44. ruff format command
We changed all code to adhere to the line limit (100 characters) and use double quotes instead of single quotes.

Figure 10. ruff formatted urls.py
Development and Production Settings
Another gem from the book Two Scoops of Django. Instead of one settings.py, we create a settings folder (i.e. python module) named settings. It will have a base.py for settings shared among all environments, and a development.py for development specific configuration (e.g. the console email backend we set up earlier) and finally a production.py
Take your my_django_project/settings.py and move it to my_django_project/settings/base.py. Then create 3 empty files: __init__.py development.py and production.py. You should end up with:
my_django_project├── __init__.py├── asgi.py├── settings│ ├── __init__.py│ ├── base.py│ ├── development.py│ └── production.py├── urls.py└── wsgi.py45. Separated settings project folder
Open up base.py and change BASE_DIR = Path(__file__).resolve().parent.parent to BASE_DIR = Path(__file__).resolve().parent.parent.parent. We need to add the extra parent as we have moved the settings file one level down.
Remove DJANGO_VITE and EMAIL_BACKEND settings from base.py. These are moved into their respective development and production settings:
from .base import *  # noqa
DEBUG = True
ALLOWED_HOSTS = ["localhost", "127.0.0.1"]
DJANGO_VITE = {"default": {"dev_mode": True}}
EMAIL_BACKEND = "django.core.mail.backends.console.EmailBackend"
46. my_django_project/settings/development.py
from .base import *  # noqa
DEBUG = False
ALLOWED_HOSTS = []
DJANGO_VITE = {"default": {"dev_mode": False}}
EMAIL_BACKEND = "django.core.mail.backends.smtp.EmailBackend"
47. my_django_project/settings/production.py
It’s important to add the # noqa comment at the end our wildcard imports. Normally ruff would remove this.
Optionally you can run a find and replace for my_django_project.settings and replace it with my_django_project.settings.development. You can always run your manage.py commands with DJANGO_PROJECT_SETTINGS=my_django_project.settings.development – but I like to not have to think about that.
Done!
We went from installing uv to having a fully running Django application. It has a working authentication flow in which we register and login by email. We render Vue component written in TypeScript into Django Templates. Our code is nicely linted and formatted. Development and production environments are separate.
I recommend you follow the steps yourself instead of blindly cloning a template. If you want to suggest any improvements, I’ve created a GitHub repository:
[
GitHub - jillesme/setting-up-django-for-success: The result of following all steps in /setting-up-django-for-success/
The result of following all steps in /setting-up-django-for-success/ - jillesme/setting-up-django-for-success
GitHubjillesme
](https://github.com/jillesme/setting-up-django-for-success)
Changelog
- 2024-01-21 – Published
