Open Graph Images in Astro: Build-Time vs Runtime
My recent move to Astro for this blog has given me new things to learn and explore. One thing I never paid much attention to is Open Graph images, or OG images. Those previews you see on social media.
I always assumed you’d just create a custom image for each page. But that’s the old way of thinking. We can now create images programmatically and serve them dynamically. Here’s an example of GitHub’s OG image for Astro:
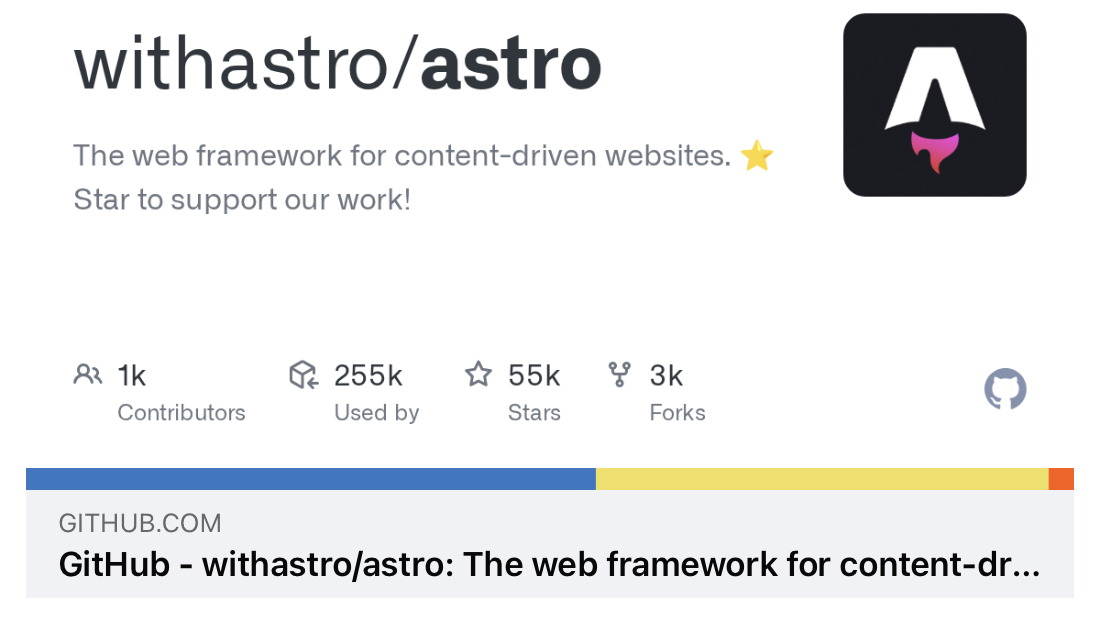
Notice how it has several dynamic elements such as stars, contributors, and the programming language distribution bar.
In this article, we’ll explore two ways you can create OG images in Astro:
- At build time
- At runtime (dynamically using an API)
While this article is about Astro, the same principles apply across frameworks.
Generating Open Graph Images at Build Time
When you only have a few pages, you might want to hand-craft your OG images. If you want to have a certain brand feel to it, you could ask your designer to make an image for you before you publish a new page or article.
We can do it in code, too! There are various ways, but the most common approach I’ve seen uses two well-maintained packages in a two-step process:
I was using this approach for this blog, until I finished writing this article and realized dynamic generation is often the better choice, more on that later.
As mentioned earlier, you’d use Satori to generate an SVG and resvg to turn it into an image. My build script looked as follows:
  import { readFile, writeFile, mkdir } from 'node:fs/promises';  import satori from 'satori';  import { Resvg } from '@resvg/resvg-js';  import matter from 'gray-matter';  import getReadingTime from 'reading-time';
  const colors = {...};
  // Get metadata for each og:image  function parsePost(source) {    const { data, content } = matter(source);    return {      title: data.title,      slug: data.slug,      tags: data.tags ?? [],      readingTime: getReadingTime(content).text,    };  }
  // JSX-like tree (could use actual JSX too)  function createOgTree({ title, tags, readingTime }) {    return {      type: 'div',      props: {        style: { display: 'flex', flexDirection: 'column', /* ... */ },        children: [          { type: 'h1', props: { children: title } },          { type: 'span', props: { children: readingTime } },        ],      },    };  }
  // Step 1 and 2 from above (svg -> png)  async function renderPng(tree, fonts) {    const svg = await satori(tree, { width: 1200, height: 630, fonts });    return new Resvg(svg).render().asPng();  }
  async function main() {    const fonts = [{ name: 'MyFont', data: await readFile('font.ttf') }];
for (const file of await glob('src/content/**/*.mdx')) { const post = parsePost(await readFile(file, 'utf8')); const png = await renderPng(createOgTree(post), fonts); await writeFile(`dist/og/${post.slug}.png`, png); } }- Parse the post to get its content and metadata
- Create a JSX-like tree without actually writing JSX
- Render into a PNG
- Write it into /dist so it’s available at runtime
You could also write these to /public so they’re treated as static assets, but I preferred generating them into dist/ during CI.
The above script ran after each build using an npm script:
{ "name": "jillesme", "scripts": { ... "og:build": "node scripts/generate-og.mjs", "postbuild": "pnpm og:build" }One caveat of using Satori is that it supports a subset of CSS. Each container element needs to have display: flex and you can’t use all CSS properties. There is also additional work required to import fonts.
If you wanted real page renders, exactly as the browser would render it… Then we can use the next method:
Using Playwright to Take Screenshots
Instead of writing JSX, what if you could automatically create a screenshot of each page and use that as the OG image?
It’s easier than it sounds. We need to add a single dependency: playwright. Then we can update our script to iterate over our posts, open them in a real browser, and take a screenshot.
...const baseUrl = process.argv.find(a => a.startsWith('--base-url='))?.split('=')[1]    ?? 'http://localhost:4321';
async function screenshotPages(posts) {    const { chromium } = await import('playwright');    const browser = await chromium.launch();    const page = await browser.newPage();    await page.setViewportSize({ width: 1200, height: 630 });
    for (const { slug } of posts) {      await page.goto(`${baseUrl}/${slug}/`, { waitUntil: 'domcontentloaded' });      await page.screenshot({ path: `dist/og/${slug}.png` });    }    await browser.close();}
Running this will result in:
$ pnpm og:build --screenshot
> jillesme-astro@0.0.1 og:build /Users/jilles/Code/jilles.me> node scripts/generate-og.mjs --screenshot
Screenshot mode: capturing 34 pages from http://localhost:4321Screenshotting http://localhost:4321/badassify-your-terminal-and-shell/Screenshotting http://localhost:4321/thinking-in-networks-cloudflare-storage/Screenshotting http://localhost:4321/setting-up-spring-jdbc-and-sqlite-with-write-ahead-logging-mode/...
This will take longer but has the additional benefits of rendering an OG image that is a real representation of your webpage. No limitations in CSS or font rendering:
The above example used 1200x630 for the browser size, but you could also use 600x315 for more condensed images or set a zoom factor in Playwright.
I don’t use this approach for my websites, but I think it’s valuable to know it is an option.
When to use Build Time Generation
Before writing this article, my understanding was that build time generation is great if you have less than a few hundred pages. After spending a lot of time thinking about this I no longer think this to be true.
Instead build time generation is great for the following scenarios:
- You want real screenshots. This takes too much time to do on demand.
- Your Open Graph images can’t easily be rendered by Satori.
- Your Open Graph images require heavy computation. I had this happen when we wanted to blur a frame of a 20 MB GIF. The Worker ran out of memory.
Since OG images aren’t fetched on every page view but only when shared on various social platforms, generating them at runtime is often the better option.
Generating Open Graph Images at Runtime
An effective approach to creating OG images is to use an API: a request to /og/post-name.png hits a GET handler that returns an image response instead of a static file.
Two popular options are:
@vercel/oguses Satori and Resvg to create a PNGworkers-oguses Satori and Resvg WASM to create a PNG
Since my blog runs on Cloudflare Workers (free plan, still!), I originally used workers-og, but the same principles apply to @vercel/og.
Adding workers-og to Astro
Installing it is easy, but testing it locally requires extra effort.
$ pnpm i workers-ogAnd then we create an API page in Astro:
import type { APIRoute } from 'astro';import { ImageResponse } from 'workers-og';
// Don't render during buildexport const prerender = false;
const colors = {};
export const GET: APIRoute = async ({ params }) => {  const slug = params.slug || 'untitled';
  // Here you could fetch dynamic data such as GitHub stars  const starCount = await getStarsBySlug(slug)
  const html = `    <div style="display: flex;">        This has ${starCount} stars!    </div>  `;
return new ImageResponse(html, { width: 1200, height: 630, headers: { 'Cache-Control': 'public, max-age=60', }, });};- Turn prerendering off so it doesn’t run during the build step.
- Load your dynamic data inside this API
- Set caching headers if generation is computationally expensive to prevent DoS attacks (Optional)
And that’s all there is to it! Or so I thought, you will likely run into the following error in your local development environment:
Cannot find package 'a' imported from /Users/jilles/Code/jilles.me/node_modules/.pnpm/workers-og@0.0.27/node_modules/workers-og/dist/yoga-ZMNYPE6Z.wasmThis confused me at first. What is Yoga? Why a?
I spent some time investigating and learned that yoga.wasm is a WebAssembly port of Facebook’s Yoga layout engine, used by React Native and… Satori!
a in this case is a minified module Vite is trying to import from node_modules, but it’s not a node module. It’s a WASM import namespace.
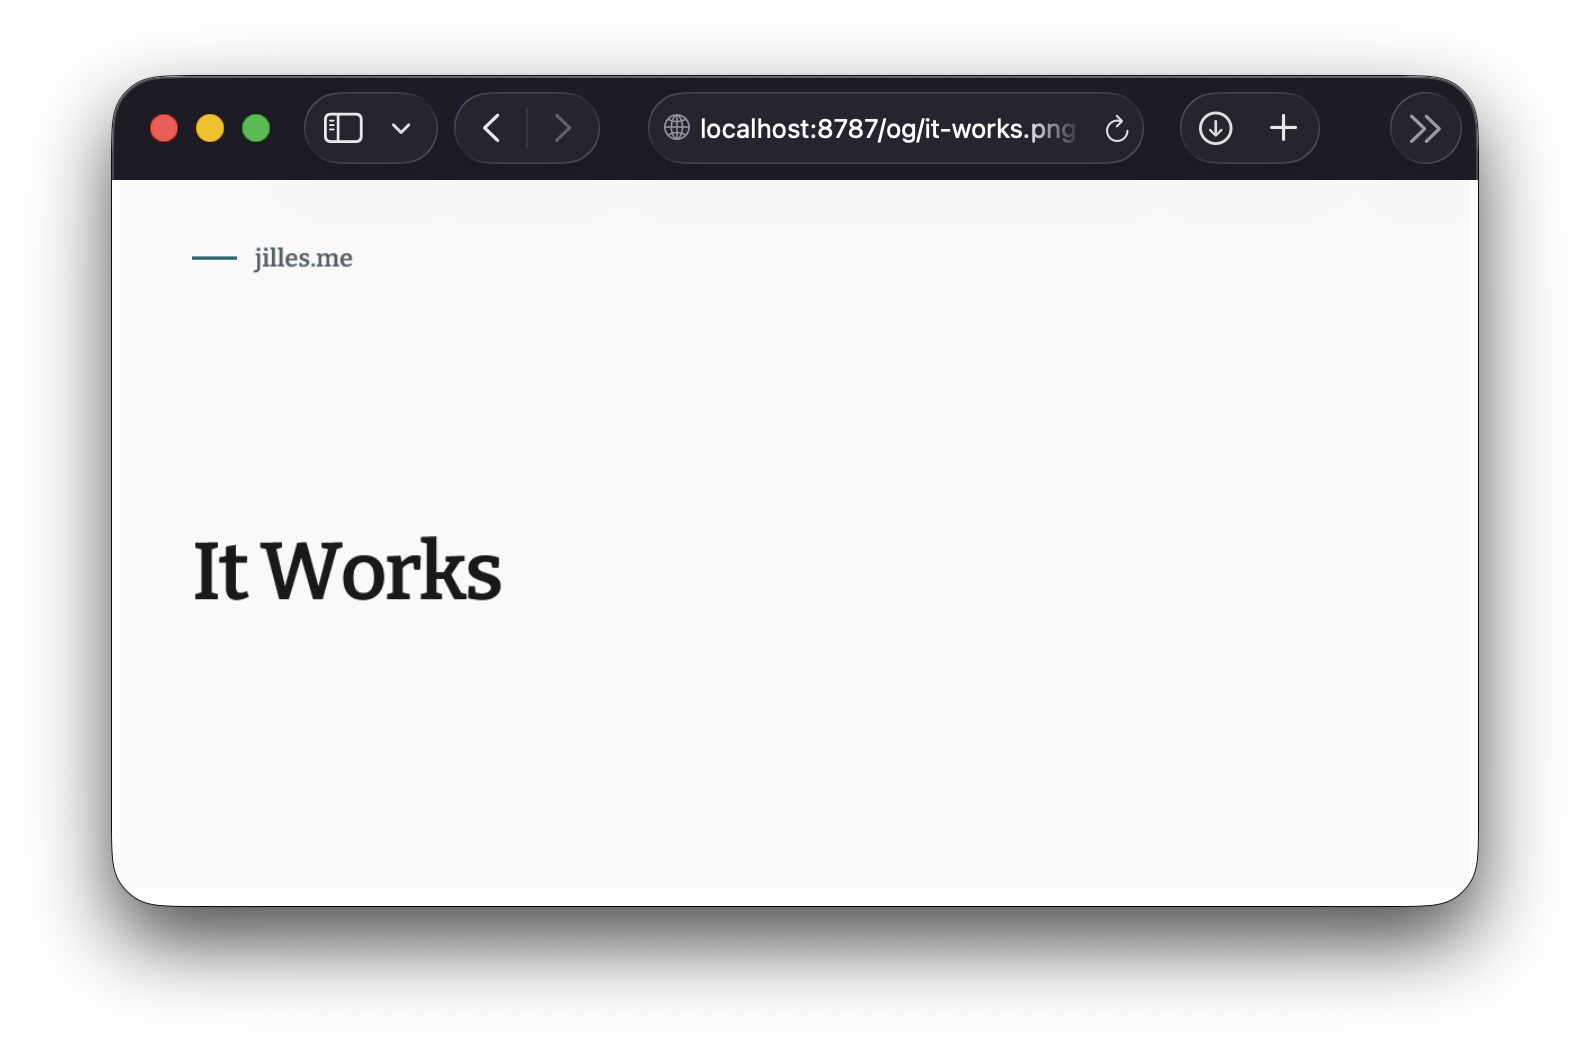
This works on Cloudflare Workers, but not during development with Vite. So how do we test it? We build our Astro site and run wrangler dev instead of astro dev.
$ pnpm run build$ pnpm dlx wrangler dev⎔ Starting local server...[wrangler:info] Ready on http://localhost:8787Now we can see our result locally before deploying:
Alternative: Adding cf-workers-og
If you don’t want to run into the issues above you can follow the following steps:
$ pnpm i cf-workers-ogCreate the API route in similar fashion:
import type { APIRoute } from 'astro';import { ImageResponse, GoogleFont, cache } from 'cf-workers-og/html';
export const prerender = false;
export const GET: APIRoute = async ({ params, locals }) => {  cache.setExecutionContext(locals.runtime.ctx);
return ImageResponse.create(<div style="display: flex;"></div>, { width: 1200, height: 630, fonts: [ new GoogleFont('Inter', { weight: 400 }), ], headers: { 'Cache-Control': 'public, max-age=60', }, });};- Import is different (cf-workers-og/html)
- Set execution context for the cache, so that your fonts get cached (avoid refetching fonts and hitting rate limits)
ImageResponse.create()instead ofnew ImageResponse- Pass a Google Font
This works locally (e.g. http://localhost:4321) and in the Cloudflare Workers environment. A nicer developer experience in my opinion.
When to Use Runtime Generation
Unless you need browser screenshots or heavy computation, runtime generation is usually the better option.
There is no build-time overhead. OG images are requested by social platforms and heavily cached, so runtime generation typically runs once per cache window (per platform). You get the option to add any sort of data inside of the Open Graph image.
I’ve become a big fan.
Outro
While writing this article I learned a lot about Open Graph images. I found opengraph.xyz an excellent resource to test out Open Graph images in production.
I learned Satori uses Facebook’s Yoga layout. How WASM modules work in Vite and Cloudflare Worker environments. It led me to work on cf-workers-og, which in turn taught me about patching dependencies using pnpm.